Share
Results 1 to 13 of 13

Thread: Tubular exhaust manifolds (Audi twin turbo V6) using schedule 10 304.

  1. #1

    Default Tubular exhaust manifolds (Audi twin turbo V6) using schedule 10 304.

    I am just starting this project and as a welding noob may be biting off WAY more than I can chew, but I've always wanted to learn how to TIG weld so I'm using this project as an excuse/opportunity to try my hand at it. I'll post pictures and ask questions as I go. Any advice/trips would be appreciated!

    Here's the "holy grail" as far as I am concerned... the kind of thing I can only dream of doing right now. This guy Markku at Agtronic Motorsport does amazing welding & fabrication work on VWs and Audis:


    Here are some parts & materials I've collected so far for my project (including "brain lube"):


    2002 Audi S4 Avant (wagon) engine bay:


    My "welding corner":


    I also have a "build thread" over on Audizine with more detailed info about the car project:

    http://www.audizine.com/forum/showth...-build-thread.
    Last edited by angular; 03-09-2011 at 05:15 PM.
    -Bradley
    PowerTig 250EX

  2. #2
    Join Date
    Dec 2009
    Location
    Greater Seattle, WA
    Posts
    813

    Default

    Looks like a fun project, Bradley! And a nicely equipped workshop.

    Is that a 60CF argon bottle? IME, welding on stainless tends to really consume the Argon. Who are you going to for your gas? I like Central Welding the best here locally.
    '13 Everlast 255EXT
    '07 Everlast Super200P

  3. #3

    Default

    Thanks, Jake! Other recent additions to the workshop include the Jet band saw and an 8" bench grinder. A chop saw might still be nice to have.

    The argon bottle is an 80 cubic foot cylinder I got from Pacific Welding Supply down here in Tacoma (where I work). I think it cost me $200 after tax (filled with argon of course). They told me it's $25 to refill a 40 cu foot cylinder but I can't remember the refill price on the 80. In retrospect I wish I'd have gone with the 125 cu foot cyinder. That seems to be the largest size cylinder that's still manageable for one person, fits in your car, etc. I definitely need to shop around a bit, see how much AirGas charges. You're absolutely right... the argon goes fast! I have thought about getting a 2nd bottle, but for now I'm just tee-ing off the main feed to separate regulators for shielding gas and back purge.
    Last edited by angular; 03-09-2011 at 06:38 PM.
    -Bradley
    PowerTig 250EX

  4. #4

    Default

    Since a couple people asked... here are some pictures of my old project car (which I no longer own). It's a 1988 Scirocco 16V with a 2 liter upgrade and custom GT30R turbo system. The car made 260 whp at about 10-12 PSI. I upgraded or modified almost everything as far as the mechanicals go: ported & polished head, dished pistons to lower CR, custom short runner intake, programmable engine management, late model 02J cable-shift gearbox with hydraulic clutch, custom 2.5" stainless exhaust, 11" brakes, etc.

    I really wished I could weld back at that time, around 2004. It would have made a world of difference!


    Last edited by angular; 03-09-2011 at 08:01 PM.
    -Bradley
    PowerTig 250EX

  5. #5

    Default

    Nice cars. May I suggest that you try to make the manifold equal length. I don't think that motor is like the VR6 where it has different lengths in the head so all the primary's should be equal for best results. This is not required but it will be a benefit. I am a little bit too much into VW's. I have a few of them and one is a 94 Jetta that is getting an R32 motor built with forged internals, 3.6L crank, Lower compression and getting twin turbos. I am converting the car to AWD. Then my other current project is a 99 MK3 Jetta 12v VR which is in the process of a full list of stuff. The 12v will eventually get a turbo setup and be swapped into my 90 Jetta. Since your into VW/Audi I will post the build threads on our local forum.

    12v VR build
    R32 AWD MK3

    I would love to see how your manifolds come out.
    Jason
    Everlast 255EXT - Perfection
    Everlast PowerPro 256 - UPS Demolished
    Everlast MTS200s
    12 Ton Shop Press
    DeWalt Hand Tools/ChopSaw

  6. #6

    Default

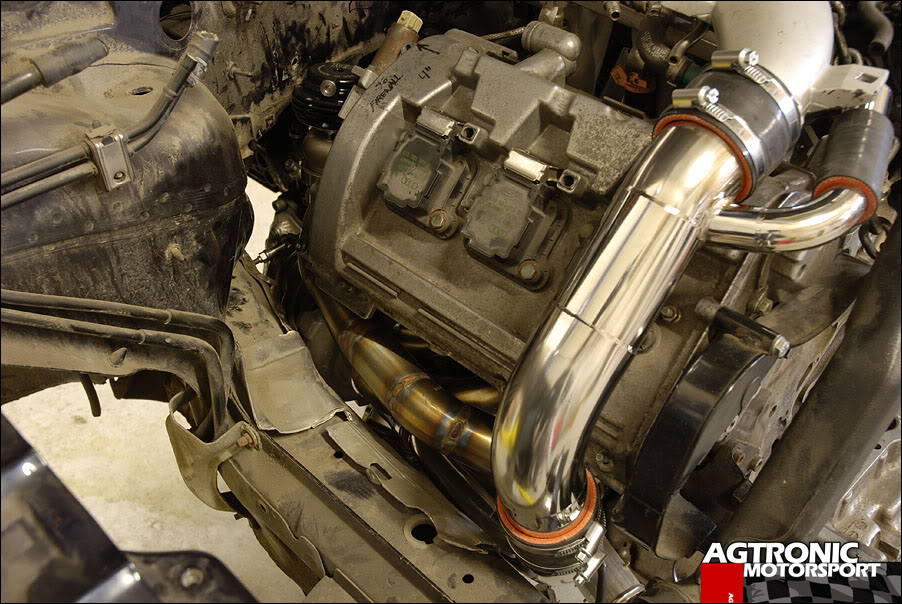
    Normally I would agree with you about the equal length runners but there just isn't much room to work with. The manifolds are extremely close to the frame rails, so space is limited and heat is also a concern. Here's another picture from Agtronic of a 2.7T with the type of turbos I am using (Garrett GT28xxR with the OEM/Nissan style compact 5-bolt turbine housing):


    Mine will look similar but minus the external wastegates. I'm going to see if I can fit the internal WG canisters on my application. Easier said than done, of course.
    -Bradley
    PowerTig 250EX

  7. #7

    Default

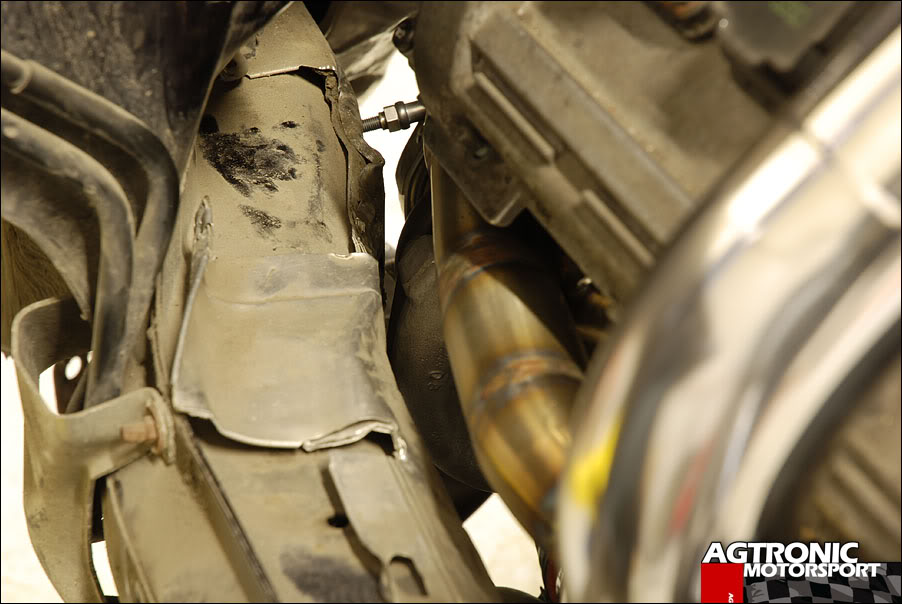
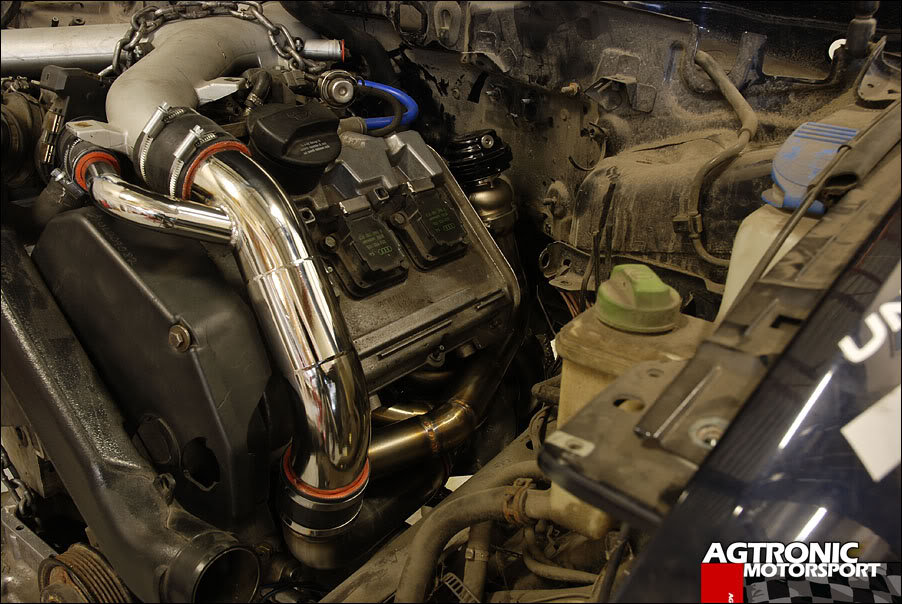
    Here are a couple of pictures showing how little space there is between the exhaust manifold and frame rail:


    Agtronic actually has an entire S4/A4 front clip that they use to test fit each custom turbo solution. The engine and gearbox in the pictures are actually empty (no internals) to save weight and make it easier to move around.
    Last edited by angular; 03-09-2011 at 08:53 PM.
    -Bradley
    PowerTig 250EX

  8. #8

    Default

    Gotta love vw/audi for cramming things against the frame rails. I guess the benefit may not be worth it to try for a turbo application. I know if can make a pretty decent difference on NA. This is going to have more than enough power I suppose the main benefit you would have got would be a little faster spool but probably not worth it to fight the gap between the frame rail.
    Jason
    Everlast 255EXT - Perfection
    Everlast PowerPro 256 - UPS Demolished
    Everlast MTS200s
    12 Ton Shop Press
    DeWalt Hand Tools/ChopSaw

  9. #9

    Default

    Back to welding & fabrication, one of my concerns with welding the manifolds is distortion from the heat. I plan to bolt the flanges to as large and thick of a hunk of metal as I can find to serve as a heatsink and hopefully prevent any warpage.

    Any other tips or tricks you guys know of to deal with warpage/distortion when welding 304?
    -Bradley
    PowerTig 250EX

  10. #10

    Default

    I could be wrong here but I don't think you need to worry about it warping. Without pulse you probably only need to use about 45A to weld the pipe to the flange. You will favor the 3/8 flange with the arc and move it to center when dipping. Maybe someone else can explain that better.
    Jason
    Everlast 255EXT - Perfection
    Everlast PowerPro 256 - UPS Demolished
    Everlast MTS200s
    12 Ton Shop Press
    DeWalt Hand Tools/ChopSaw

  11. #11

    Default

    very impressive!!
    the dude who welded that first manifold must be a machine!
    looking forward to the progress on this project!
    300whp FWD 94 Celica
    PowerPro 205 with a hack behind the mask!

  12. #12

    Default

    the "welding tips and tricks" guy has a video about heat warping and using cooling plates, I can't remember for sure, but I think he was using it for thin gauge stainless, maybe aluminum. Anyway a huge piece of copper or aluminum would definitely dissapate heat better than steel, if warpage is indeed a concern.
    I'd like to think I'm the guy they are talkin about when they say, "he could F%^& up a cannon ball in a plowed field."
    .................. /...\
    ..............-...|.....|
    ...*.......-'. \..\__/
    ....\.-'.........\
    ... /......... _/
    ...|......... /"
    ...|.... /_\'
    ....\....\_/
    ......""""

  13. #13
    Join Date
    Dec 2009
    Location
    Greater Seattle, WA
    Posts
    813

    Default

    Restraining something while applying heat (such as welding) can definitely help "persuade" it into a certain shape, or prevent it from warping into an undesirable shape while welding. Another approach is to anticipate and accept the warpage (from the contracting cooling weld bead) that will occur from welding, and set up the pieces in a way that makes the shape correct after the weld bead contracts, or use the contracting forces of the weld bead to change the shape into a desired shape.

    For example, if you welded on only one side of a turbo mounting flange where the pipes protrude, with the cylinder head side of the flange kept relatively cool, the contracting forces of the weld bead may warp the flange into a bit of a cup shape. With the concave side being on the direction of the pipes.

    If you then let it all cool, and ran some weld bead on the other side (cylinder head) side of the flange, you could persuade the flange to warp back to flat. Obviously the welding on the cylinder head surface probably would require surfacing afterward, but it could be done in a way that doesn't remove much material or make excessively thin portions of the flange.

    I repaired a stainless steel turbo header for a customer (pictures attached, shows manifold prior to repair) that had the turbo mounting flange leaking exhaust gas because it was excessively thin. It was thin I believe because during original manufacture, it warped from weld bead connecting the tubes to one side of the flange, and then the warped tubes became subsequently over-thinned in one area from a surfacing operation afterward. The flange material in the middle where it was machined away the most was not rigid enough to reliably seal exhaust gas long term and the flange bent back the other way (that bolts were pulling it) and warped back the other direction during operation. Possibly overtightening the fasteners and a less than optimal gasket were contributing factors. I built up material on the flange where it was thin, and subsequently surfaced it to increase the flange rigidity. Doing some welding on the cracked bead on the back side, also helped pull the flange back straight so it was more uniformly thick and I had minimal material to remove surfacing it flat afterwards.

    Unfortunately all I have is the "before" pics on this. The tubing was ground away on its ID excessively thin in the cracked area right next to the flange, as someone got carried away with a die grinder and thinned the tubing out here too much without adequate weld bead deposit on the other side, creating a weak spot. The welded tubing was also undercut. I beefed up the weld bead to get rid of the thin, ground and undercut spots (and of course fix the crack) and eliminate the stress riser. A major contributing factor to the crack was also that turbo and downpipe were not supported, so the thin header tubes were carrying high vibrational stresses. These stainless header tubes were probably .049-.065'ish.

    Oh another way to reduce warping is to limit heat input and make a smaller weld bead. Using TIG pulsing, and a tight arc can be helpful to limit heat input and narrow the bead width. A "just large enough to get the job done" size weld bead will contract the material less than a "massive overkill size" weld bead. Also, a braized joint will warp far less or not at all compared to a welded joint. A good way to construct a thin-wall tubular header flange connection I've read about (but not tried) is to have the thin-wall tubing protruding into a hole machined in the flange, and TIG weld from the cylinder head side of the flange the end of the tubing to the ID of the flange. Then, for additional strength, add a braize fillet (such as silicon bronze) on the other side where the tubes protrude away from the flange. The braizing operation doesn't heat up the parent metal as much and causes much less distortion than a high temperature welding deposit. The braize material does have a different appearing, gold colored deposit compared to a weld deposit. This particular manifold pictured I think has a braized fillet, based on its appearance.
    Attached Thumbnails Attached Thumbnails Click image for larger version. 

Name:	IMAG0042_small.JPG 
Views:	817 
Size:	66.3 KB 
ID:	1124   Click image for larger version. 

Name:	IMAG0035_small.JPG 
Views:	1121 
Size:	86.8 KB 
ID:	1123  
    Last edited by jakeru; 03-10-2011 at 08:55 PM.
    '13 Everlast 255EXT
    '07 Everlast Super200P

Similar Threads

  1. Project #11 From Jason: MK3 AWD 3.4L Twin Turbo Jetta
    By Jason in forum Other Custom Fabrications
    Replies: 21
    Last Post: 06-05-2013, 05:35 AM
  2. Twin turbo mustang intake
    By Zmechanic in forum On Road Fabrication
    Replies: 25
    Last Post: 04-28-2013, 06:46 PM
  3. Project 1 From TT WS6 - Twin Turbo Trans Am
    By tt ws6 in forum On Road Fabrication
    Replies: 6
    Last Post: 12-09-2012, 12:27 PM
  4. Project 1 from Injected65. Twin Turbo Kit
    By Injected65 in forum On Road Fabrication
    Replies: 13
    Last Post: 06-01-2012, 07:39 PM
  5. Aluminum exhaust manifolds
    By jtybt in forum On Road Fabrication
    Replies: 16
    Last Post: 03-16-2010, 01:18 AM

Posting Permissions

  • You may not post new threads
  • You may not post replies
  • You may not post attachments
  • You may not edit your posts
  •