Share
Page 1 of 3 123 LastLast
Results 1 to 20 of 43

Thread: First tig welding attempts, and wp26 torch questions

  1. #1

    Default First tig welding attempts, and wp26 torch questions

    Hey all, got my power pro205 in Monday, and have been playing with the tig.
    I've never tig welded before, only welding experience I have is messing around with my 110v mig welder welding up exhausts and what not in the garage.
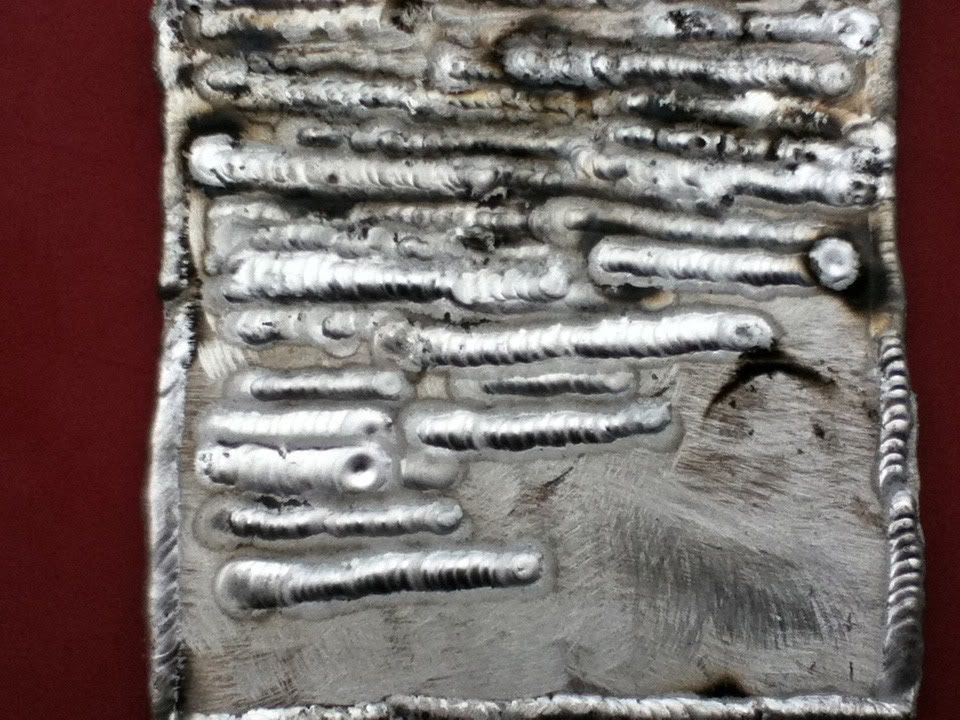
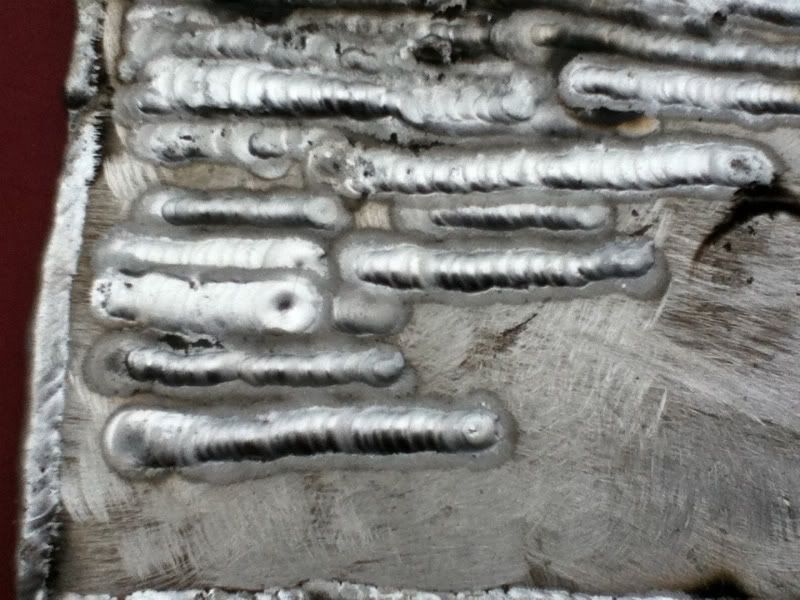
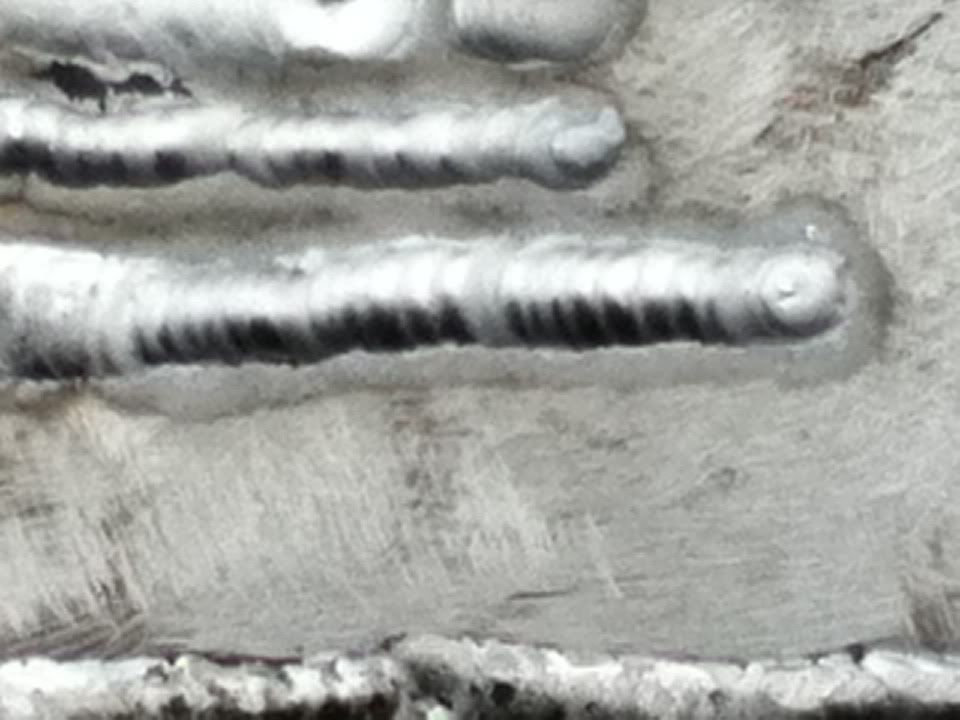
    A buddy gave me a peice of ~3/16" aluminum diamond plate he had laying around, so that's what I started on. These pics are the first 3hrs of practice.
    Various settings thruout, but the last couple pics are setup with:
    3/16" aluminum diamond plate ( welding on the backside)
    3/32 2% thoriated tungsten, sharpened to a dull point
    3/32 4043 filler
    ~120-125 amps or so
    AC freq. ~1:00
    AC balance ~10:00
    No pulse
    A hair of pre and ~ a few seconds of post flow


    I was pretty happy with the bead in the middle of this pic


    Suggestions and comments are welcome and needed!!!
    At least I feel like the hrs spent on jodys site helped alot, definitely would suggest to anyone starting out to make the time to go thru jodys site and watch and read as much as you can, lots of helpful info and as he calls it, "no bull, no frills, down and dirty welding tips and tricks!"
    For those who don't know who I'm talking about, his site is www.weldingtipsandtricks.com
    Also learned alot from you guys as well!!
    300whp FWD 94 Celica
    PowerPro 205 with a hack behind the mask!

  2. Default

    I'll say your progressing faster than I did
    Powertig 225LX

  3. #3

    Default

    Looks to me like your doing pretty well for a beginer. The welds I made the first time were not any better. Like you said, Jody's site is an amazing resource. The only suggestion I can give is to keep practicing. I spent several hours just playing with the various settings on my 250ex. Have fun!!
    When opportunity knocks, most do not recognize it, because it shows up wearing overalls and looking like work!!
    Joshua,Tacoma,Wa
    24'x48'shop-6/2010
    Hobart Handler125w/125cf 75/25-1998-Welds perfect
    Power tig250EX-w/300cf argon-2/2011-had 4053 problem, fxed and good as new
    Power Cool W300-4/2011-works great after making hoses
    Power Plasma 50-4/2011-in for repair
    Shop air

  4. #4

    Default

    Thanks guys. Got some more practice in today, tried a t joint, broke way easy, definitely not enough penetration, which I pretty much expected.
    Still need lots more practice, and a run to the local lhs, the gas cups that were sent with the welder are odd, they set 5,6, and 7 cups but only the 5 fits into the white collar that goes on the torch, but then the cup won't thread into place.
    I ended up using the 7 cup, without the white collar.
    Imma hit the local welding shop, see if I get some help from them and get some spares.
    Also burned a couple 6010 rods, nothing pretty to show off, but it definitely sounds great and burns smooth, but thats another forum. Lol
    300whp FWD 94 Celica
    PowerPro 205 with a hack behind the mask!

  5. #5

    Default

    Try scribing some lines about 1/2" apart on the coupon, then try to follow the line when welding. It's best to have 3 or more coupons marked out like this, that way you always have one that is cooled enough to weld on when you are doing steady weld practice.

    Once all of the lines on all of the coupons are filled up with weld, go back and do nice straight beads in between the existing beads.
    In this way you will be learning to make a straight weld at the same time you are learning to tig weld.


    Glen
    Everlast PP256
    Everlast Imig 200
    Everlast Power Ultra 205
    P&H 400 amp A.C.
    Miller 230 amp with Onan power

  6. #6

    Default

    Quote Originally Posted by worntorn View Post
    Try scribing some lines about 1/2" apart on the coupon, then try to follow the line when welding. It's best to have 3 or more coupons marked out like this, that way you always have one that is cooled enough to weld on when you are doing steady weld practice.

    Once all of the lines on all of the coupons are filled up with weld, go back and do nice straight beads in between the existing beads.
    In this way you will be learning to make a straight weld at the same time you are learning to tig weld.


    Glen
    Thanks for the tip, glen, I'll have to try that.

    Anyone have any thoughts on the torch issue? Found out new Bedford welding supply is 1.4 miles from my work, so I will probably stop by there tommorow while I'm on my lunch break with the torch and see what we come up with.
    300whp FWD 94 Celica
    PowerPro 205 with a hack behind the mask!

  7. #7

    Default

    oh one other thing, make it easy on yourself and start in by tig welding on mild steel. Not saying it can't be done by learning on Aluminum right off, but it is more difficult, so you might as well master torch handling and rod feed while welding the easier metal. I think the overall time required to get proficient will be less if you start out this way.

    Aluminum requires more pedal control and is generally just a tougher row to hoe.

    Glen
    Everlast PP256
    Everlast Imig 200
    Everlast Power Ultra 205
    P&H 400 amp A.C.
    Miller 230 amp with Onan power

  8. #8

    Default

    Clean, clean and clean! That aluminum looks kinda dirty, I would hit it with a wire brush, then wipe it down with some acetone to get a nice clean bead. Aluminum is a sponge and sucks up oils and contaminants like crazy, so it makes a huge difference to prep the material before you weld

    Other than that it looks like you are off to a great start. I see a couple of black spots where you might have contacted the tungsten to the base metal, if that happens make sure to clean up the tungsten to maintain a nice even arc.

  9. #9

    Default

    Do you always get a black soot spot when you hit the tungsten? I have been working on getting the tungsten as close as I can to the puddle with out dipping in. Some times I will start getting what looks like a green glow to the arc and I just assumed that was when the filler hit the tungsten.
    sold my miller mig
    got a PT250EX
    saving up for a plasma cutter

  10. #10

    Default

    Yea, this aluminum is really crappy, and the soot is crap burning off when I dip the tungsten, I assume.
    I used a 40grit grinding disk to cut off the crap and crud. I gotta bet some better stuff to practice on.
    300whp FWD 94 Celica
    PowerPro 205 with a hack behind the mask!

  11. #11
    Join Date
    Dec 2009
    Location
    Greater Seattle, WA
    Posts
    813

    Default

    That is correct. The "soot", aka "smut", happens when aluminum gets on the hot tungsten tip and vaporizes, then the aluminum vapor condenses (usually combining with oxygen in the atmosphere) and forms millions of tiny aluminum oxide particles (they have a black powder "soot like" appearance due to the small size of the particles.) You can also wipe it right off.

    Also, yes, sometimes its possible to touch your tungsten and not get any smut or very minimal amount. Sometimes you get a big blob of of metal wicked up onto your tungsten. It depends what you are welding, and how hot your tungsten is. Sometimes if you get just a tiny bit, you can "burn it off" and keep welding. Trying to burn off a metal blob off your tungsten can make a mess though. And your tungsten may not really ever fully recover from it, until you grind it down fresh.
    '13 Everlast 255EXT
    '07 Everlast Super200P

  12. Default

    Quote Originally Posted by presure2 View Post
    Still need lots more practice, and a run to the local lhs, the gas cups that were sent with the welder are odd, they set 5,6, and 7 cups but only the 5 fits into the white collar that goes on the torch, but then the cup won't thread into place.
    I ended up using the 7 cup, without the white collar.
    It sounds like you may be trying to install the cups backwards. The chamfered side should be toward the torch, sealing against the white collar.

    -Dave

  13. #13

    Default

    Quote Originally Posted by IST Dave View Post
    It sounds like you may be trying to install the cups backwards. The chamfered side should be toward the torch, sealing against the white collar.

    -Dave
    hehe, you know, that is a distinct possibility.
    ill get some pics this weekend.
    300whp FWD 94 Celica
    PowerPro 205 with a hack behind the mask!

  14. #14

    Default

    hey guys, finally had some time to mess with the welder some, and like was posted above, i had installed the gas cup backwards..lol
    anyway, played somemore with some 1/8th steel, welding up some butt joints without filler rod to get a feel for torch speed and manipilation...couldnt bust em apart after smashing them over 90* in the vice with a BFH, so i guess its getting better!
    argon tank is just about empty, its under 500psi on the gauge now..ill have to have it refilled this week.
    thanks!
    300whp FWD 94 Celica
    PowerPro 205 with a hack behind the mask!

  15. #15

    Default

    I have also been taking a sharpie marker and putting the the date on my practice coupons . I use 4 4"x 6" 3/16 mils steel. I rotate through 3 of them each session leaving one from the session before out to compare to just out of the way. when i am done i Put the date on the three that I used that session and wipe the comparison one clean, that one will be rotated in on the next session and the best one from my previous session will be my comparison piece.

    Now here is the reason for the dates, when i get done with a tig practice session I take pictures of the coupons and the front of the welder so I can remember my settings and compare them to the dated coupon, I am also making alot of notes and I have a few cheat sheets to look at for welder settings and weld appearance ( how they look , too hot, too cold, too fast, too, slow ect,) cant remember where I found that pic but it helped at the beginning a lot. My biggest problem now is just getting into a rhythm once i have the correct amp setting . I am paralyzed from the chest down and use the 4t setting on my torch and use that to control my heat by constantly tapping the torch button from steady arc, to my end/start to feather the arc for lack of a better term all the while keeping my forward and back motion and feeding the filler in at the proper time to get that proper stacked overlap look. Right now my longest bead that looks primo is abut 4" long .

    I forsee lots more practice until I no longer have to think about what I am doing with the torch and can just think about the bead I am laying down. Right now I go an inch or two and fall out of rhythm and then have about 1/2 or so where it gets ugly and then I pick it up again and get back into a rhythm,but I really have to think a lot about what I a doing. With practice ( a lot more) I am hoping It all becomes a lot more instinctive and I will just automatically do what I need to do based on what I am seeing that having to think about every "step" as I go.

    BTW do what glen said and scribe lines 1/2 " apart, weld those then fill the gaps once all the lines have beads. when those are full rotate your work 90 deg and do the same thing until you fill that flat the turn 90 again , just keep repeating that. And I forgot to mention, I am practicing on mild steel because it's easier and doesn't have to be cleaned so much as aluminum. And on last Thing......

    Never use brake cleaner to clean any metal before you weld on it. It has the ingredients in it to create Phosgene gas and will kill you. read this http://www.brewracingframes.com/id75.htm

    Good old Mineral spirits wiped on with a cloth rag and the wiped again with a dry rag will do the trick safely. I try to stay away from anything aerosol since reading that. I am by no means a pro so any feedback from more experienced welders on this subject would be appreciated.

    Good luck and Practice, practice, Practice
    Don

    MTS 200 workhorse
    PowerTig 250EX <---sweet
    80 amp HF inverter arc welder
    Lincoln Buzzbox
    Rotobrute AC-35 Mag Drill
    Milwaukee mag drill
    HF Heavy Duty 16 Speed Bench Drill Press (Custom made Adjustable Height stand)

    I gotta find more junk to sell on EBaY ... Must Buy a Plasma Cutter and a Mig Welder


    Fullerton, Ca
    USA

  16. Default

    Quote Originally Posted by aaxiss View Post
    I have also been taking a sharpie marker and putting the the date on my practice coupons . I use 4 4"x 6" 3/16 mils steel. I rotate through 3 of them each session leaving one from the session before out to compare to just out of the way. when i am done i Put the date on the three that I used that session and wipe the comparison one clean, that one will be rotated in on the next session and the best one from my previous session will be my comparison piece.

    Now here is the reason for the dates, when i get done with a tig practice session I take pictures of the coupons and the front of the welder so I can remember my settings and compare them to the dated coupon, I am also making alot of notes and I have a few cheat sheets to look at for welder settings and weld appearance ( how they look , too hot, too cold, too fast, too, slow ect,) cant remember where I found that pic but it helped at the beginning a lot. My biggest problem now is just getting into a rhythm once i have the correct amp setting . I am paralyzed from the chest down and use the 4t setting on my torch and use that to control my heat by constantly tapping the torch button from steady arc, to my end/start to feather the arc for lack of a better term all the while keeping my forward and back motion and feeding the filler in at the proper time to get that proper stacked overlap look. Right now my longest bead that looks primo is abut 4" long .

    I forsee lots more practice until I no longer have to think about what I am doing with the torch and can just think about the bead I am laying down. Right now I go an inch or two and fall out of rhythm and then have about 1/2 or so where it gets ugly and then I pick it up again and get back into a rhythm,but I really have to think a lot about what I a doing. With practice ( a lot more) I am hoping It all becomes a lot more instinctive and I will just automatically do what I need to do based on what I am seeing that having to think about every "step" as I go.

    BTW do what glen said and scribe lines 1/2 " apart, weld those then fill the gaps once all the lines have beads. when those are full rotate your work 90 deg and do the same thing until you fill that flat the turn 90 again , just keep repeating that. And I forgot to mention, I am practicing on mild steel because it's easier and doesn't have to be cleaned so much as aluminum. And on last Thing......

    Never use brake cleaner to clean any metal before you weld on it. It has the ingredients in it to create Phosgene gas and will kill you. read this http://www.brewracingframes.com/id75.htm

    Good old Mineral spirits wiped on with a cloth rag and the wiped again with a dry rag will do the trick safely. I try to stay away from anything aerosol since reading that. I am by no means a pro so any feedback from more experienced welders on this subject would be appreciated.

    Good luck and Practice, practice, Practice
    Good practice not to use it, but only chlorinated cleaners can create phosgene. I use non chlorinated and then dry it off with air if I absolutely need it clean. Or more typically I just use acetone
    http://www.ideadevgroup.com/

  17. #17

    Default

    yea I head acetone is good too, but I didn't have any of that. had the mineral spirits and some MEK which I didn't want to try as that stuff has a bunch of ingredients that sounded bad, and I didn't want to take any chances.

    I will add acetone to my list ... mineral spirits, alcohol in a hand spray bottle and acetone ( gotta buy some once I'm up and about )

    Pressure sore is getting better but I'm still limited to only 30 mins of sitting time every 4 hours but I'm healing fast.
    Don

    MTS 200 workhorse
    PowerTig 250EX <---sweet
    80 amp HF inverter arc welder
    Lincoln Buzzbox
    Rotobrute AC-35 Mag Drill
    Milwaukee mag drill
    HF Heavy Duty 16 Speed Bench Drill Press (Custom made Adjustable Height stand)

    I gotta find more junk to sell on EBaY ... Must Buy a Plasma Cutter and a Mig Welder


    Fullerton, Ca
    USA

  18. #18
    Join Date
    Oct 2010
    Location
    Northern Virginia
    Posts
    1,323

    Default

    I bought some acetone recently because I heard you could mix it 50/50 with radiator fluid to make a penetrating fluid for rusty bolts. (Haven't tried it yet.) But this idea probably belongs in the "shop tips and tricks" thread.

    Don, glad to hear you're getting better!
    DaveO
    Oxweld oxy acet gear
    IMIG 200
    PowerTIG 210 EXT... Amazing!

  19. #19

    Default

    why not just hit it with a stainless wire wheel? That is what I have been doing and it give you nice clean shinny metal to work with
    sold my miller mig
    got a PT250EX
    saving up for a plasma cutter

  20. Default

    Quote Originally Posted by dgarnier View Post
    why not just hit it with a stainless wire wheel? That is what I have been doing and it give you nice clean shinny metal to work with
    If you try that on aluminum you will just smear and embed the oxides
    http://www.ideadevgroup.com/

Similar Threads

  1. Torch questions
    By DJLVA in forum Pre-sales, Sales and Shipping questions
    Replies: 11
    Last Post: 07-10-2017, 12:07 AM
  2. Different torch questions
    By Gunther in forum Pre-sales, Sales and Shipping questions
    Replies: 6
    Last Post: 07-05-2017, 10:10 PM
  3. Model 26 Torch & General Torch Questions...
    By Ray C in forum TIG Welding (GTAW/GTAW-P)
    Replies: 14
    Last Post: 08-26-2012, 04:47 PM
  4. more torch questions
    By worntorn in forum TIG Welding (GTAW/GTAW-P)
    Replies: 4
    Last Post: 08-07-2011, 10:52 PM
  5. first tig fusion bead attempts.
    By Ram48 in forum TIG Welding (GTAW/GTAW-P)
    Replies: 9
    Last Post: 08-01-2011, 04:57 AM

Posting Permissions

  • You may not post new threads
  • You may not post replies
  • You may not post attachments
  • You may not edit your posts
  •