Share
Results 1 to 20 of 21

Thread: Pedal vs trigger and my welding table

Hybrid View

Previous Post Previous Post   Next Post Next Post
  1. #1

    Default Pedal vs trigger and my welding table

    Hi ya'll! I haven't really had the opportunity to practice with my pu205, but hopefully this week I will. This is probably a worn out question, but it's new to me, so~

    The pedal: I will set no amps cause the pedal does that? how do I know how much to push? will it burn a hole through the metal if too far, or when is enough enough, and how do I achieve the mark, or once I establish the correct amp~ can I just leave it at that spot until I finish welding? There's very litte mention of the pedal other than how important it is to master it!

    The trigger on the handle: I set my amps to what I think is correct, practice a bit to see if I'm at the correct amps to what I'm Tigging? This sounds much easier~ for me anyway.

    Advice on this subject it quite welcome! the present setting I want to learn quickly is on the gauge metal of the dash on my '59 Apache truck. I need to repair the radio panel with new metal. I'd really like to do this with my Tig vs. my mig.

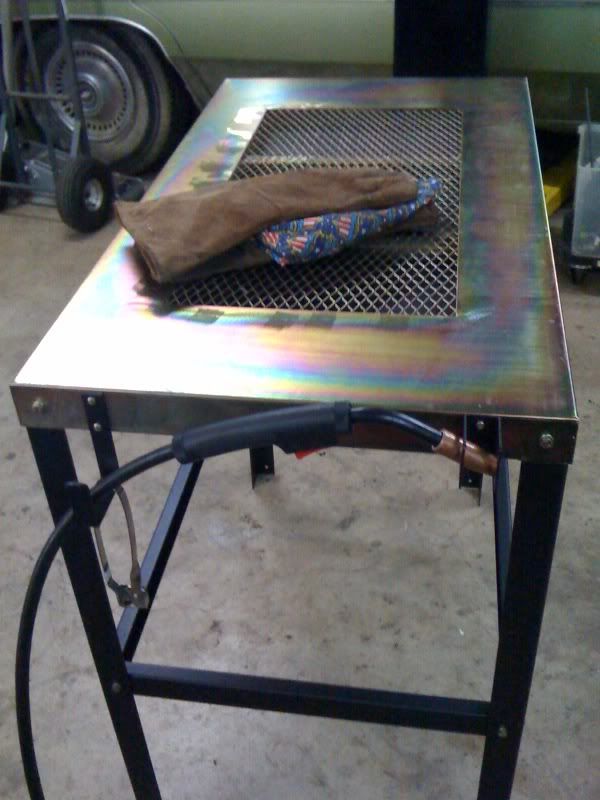
    This is a table a bought at northern tools~ it's great, it's light and the sparks go down into the mesh(a lot of it) when I practice with my mig. It was about 80bucks. I need to go back to the welding supply to buy stuff; I have 1/16 red tungsten, 1/16 rod(filler), argon bottle. I just need to find some metal of the thickness I'll be welding. I thought I saw a man coming out of Northern tools with some small steel plates, or maybe Ace hardware may have some proper gauge.
    dne'


  2. #2

    Default

    The dash is probably somewhere around .040-.050" thick. A rule of thumb for sheetmetal work is 1 amp per .001" thickness. Certainly not something that is carved in stone, but nonetheless a good starting point.

    Wen using the pedal, the amps that you are at should display on the machine panel, they just wont display when you are adjusting them on the pedal (assuming the PU205 operates with an amp adjustment located on the pedal, otherwise, use the panel knob to set the max amps).

    I would recommend finding something about 1/8" thick to practice on at first. That way you can get the hand of the operation of the torch, pedal, and trigger, as well as to understand the dynamics of the weld puddle.

    With steel, you can watch the metal and see the puddle form, then start to move the torch. Start out with just running a bead on plate (no filler) just to learn how to push the puddle. Then add filler as you get comfortable.

    As my highschool metal shop teacher used to say....Heat it and it will flow....

    John
    Everlast 200DX
    Everlast PT185
    Shoptask 3-in-1 (not currently in my garage, but I own it...)

    Any day on a motorcycle like this that ends just needing parts and labor is a good day.
    4.82, 158.67mph 1/8th mile 7.350, 200.35mph 1/4 mile
  3. #3

    Default

    I like that table that you have. I was thinking about making something out of scrap and maybe Ill add the mesh. Is there ever a time you wish it did not have that. I would think that small things may fall through or things may get caught in it.

    As to the amp settings, when using a foot pedal I like to set my amps a little higher than I need and then use the pedal almost all the way. This allows me room for that little extra if I get to a point that needs a little more heat. If you are too hot, you will know by the metal melting away and you wont have any control over the puddle.
    Jason
    Everlast 255EXT - Perfection
    Everlast PowerPro 256 - UPS Demolished
    Everlast MTS200s
    12 Ton Shop Press
    DeWalt Hand Tools/ChopSaw

  4. #4

    Default

    Well, I guess I get to shop for .040-.050 sheetmetal soon, like today! lol I'm not to dare lay my tig on my dash until I feel comfortable tigging, no hurry here!

    As for my table regarding the mesh, yes, I wish I had a plate to put over the mesh part cause I don't need it all the time, plus a little extra weight on the table may be nice since it's pretty lighweight (36lbs), but heavy enough to stay put, but light enough to move around my ever growing smaller garage! ; )

    Maybe this afternoon I can go out to a steel place I know of and see if I can buy a sheet of metal to practice my tig.
    I'll be back!
    dne'

  5. #5
    Join Date
    Oct 2010
    Location
    Northern Virginia
    Posts
    1,323

    Default

    Quote Originally Posted by Dne007 View Post
    Maybe this afternoon I can go out to a steel place I know of and see if I can buy a sheet of metal to practice my tig.
    Hopefully not telling you something you already know: you may find retail steel to be surprisingly expensive. At your steel supplier, you can find "drops", the miscellaneous odds and ends that remain from custom cuts, and they're often free or cheap. For scrap practice pieces, this can work out for you.
    DaveO
    Oxweld oxy acet gear
    IMIG 200
    PowerTIG 210 EXT... Amazing!

  6. #6

    Default

    Quote Originally Posted by DaveO View Post
    Hopefully not telling you something you already know: you may find retail steel to be surprisingly expensive. At your steel supplier, you can find "drops", the miscellaneous odds and ends that remain from custom cuts, and they're often free or cheap. For scrap practice pieces, this can work out for you.
    The place I went for steel did not work that way. They charged me for a little piece of round bar that was probably scrap to what I purchased the day before. I am not complaining about it but I see people post all the time that their local places give them small scrape for free and such. Maybe one day they will just toss something in for me but if not, oh well as it's only right I pay anyway.
    Jason
    Everlast 255EXT - Perfection
    Everlast PowerPro 256 - UPS Demolished
    Everlast MTS200s
    12 Ton Shop Press
    DeWalt Hand Tools/ChopSaw

  7. #7

    Default

    Quote Originally Posted by sportbike View Post
    The dash is probably somewhere around .040-.050" thick. A rule of thumb for sheetmetal work is 1 amp per .001" thickness. Certainly not something that is carved in stone, but nonetheless a good starting point.
    When I hooked a gas valve torch to my I-MIG and was having issues welding thin metal even on the 30a minimum setting, Mark said that their inverters weld quite a bit hotter than the 1a/.001" rule. that rule tracked pretty well on my dad's Lincoln precision tig 185, though (square wave transformer welder).

    that dash might also be a bit thicker than that, too. some cars/trucks were stamped with body panel thickness, some were thinner. I'd get out a sheet metal gage, dial caliper, micrometer, whatever you have, and make a check.


    I agree with Johns suggestion of starting on 1/8", though. it can be hard to figure out what's going on when welding on sheet metal because things (like blowing a hole) happen so much faster. once you get a feel for what the puddle looks like with too little heat, too much heat, and just right heat, then move on to something thinner.
    McGuire Irvine
    Crow Motor Co.

    Lincoln powermig 225 (work)

  8. #8
    Join Date
    Sep 2011
    Location
    Middleburg Florida
    Posts
    556

    Default

    Parts of my truck are 12-16 ga, quite heavy compared to newer vehicles. The floor is heavy enough it almost killed my nibbler, has to be in the 10-12 range. The dash is 14-16. VERY nice to handle compared to really thin sheet on the body. What I did before I approached it was to take the areas of the patch and dash I trimmed off and work on getting them welded up first. Same metal, same thickness, etc. Finding some other sheet similar thickness would be the next best thing. Don't be afraid of a little hammer/dolly work as you go.
    Trip Bauer
    Former USN HT
    Everlast 200DX New Model
    Hobart Handler 125 MIG
    Van Norman #12
    Atlas 12" engine lathe
    '98 RoadKing - 84 Ironhead - 59 Ironhead

  9. #9

    Default

    Quote Originally Posted by Trip59 View Post
    Don't be afraid of a little hammer/dolly work as you go.
    this is essential in sheetmetal welding. the weld shrinks as it cools, you need to hammer it back out. best way is to grind the weld down to just a bit proud of the parent metal, then hammer. you should do this after each pass when you're skip welding (which you should be if it's 18ga or thinner). of particular note when skip welding is the ends of your welds. the ends will pull metal along your weld seam as well as perpendicular to it, making a pucker, so you have to work them a bit more to get it flat.
    McGuire Irvine
    Crow Motor Co.

    Lincoln powermig 225 (work)

  10. #10

    Default

    Quote Originally Posted by Dne007 View Post
    Hi ya'll! I haven't really had the opportunity to practice with my pu205, but hopefully this week I will. This is probably a worn out question, but it's new to me, so~

    The pedal: I will set no amps cause the pedal does that? how do I know how much to push? will it burn a hole through the metal if too far, or when is enough enough, and how do I achieve the mark, or once I establish the correct amp~ can I just leave it at that spot until I finish welding? There's very litte mention of the pedal other than how important it is to master it!

    The trigger on the handle: I set my amps to what I think is correct, practice a bit to see if I'm at the correct amps to what I'm Tigging? This sounds much easier~ for me anyway.

    Advice on this subject it quite welcome! the present setting I want to learn quickly is on the gauge metal of the dash on my '59 Apache truck. I need to repair the radio panel with new metal. I'd really like to do this with my Tig vs. my mig.

    This is a table a bought at northern tools~ it's great, it's light and the sparks go down into the mesh(a lot of it) when I practice with my mig. It was about 80bucks. I need to go back to the welding supply to buy stuff; I have 1/16 red tungsten, 1/16 rod(filler), argon bottle. I just need to find some metal of the thickness I'll be welding. I thought I saw a man coming out of Northern tools with some small steel plates, or maybe Ace hardware may have some proper gauge.
    dne'
    Nice table!

    I use the foot pedal about 90% of the time. I set my maximum amps on the machine that the material I am welding is needed. I then can use the pedal to control the arc better in areas of like edges where burn through may be a problem. When needed, I just mash the pedal down for the maximum amperage the machine is set for that material. I also use the pedal as sort of a pulse setting. With thin aluminum, I can weld, then cut back a bit and move the torch, then weld again. Sort of like beating a drum with a foot pedal. Pacing the weld.

    When I weld thin steel, I can back off on the amperage with the pedal so I do not warp the sheet metal. Works really well on body work and small projects where a constant arc may make welding impossible.

    If you get an aftermarket torch with no trigger, then you will be forced to use the foot pedal. No 2t or 4t to use. Using the foot pedal all the time makes you concentrate more on the weld and the way the puddle is worked. Sort of like chewing gum, walking and talking on the cell phone at the same time. Pretty soon it becomes natural.
    Powertig 250EX
    Powerplasma 50
    Hobart Handler 210 with spoolgun
    Cobra 2000 / Henrob O/A torch
    Drill press / metal brake / 36 ton air hydraulic press
    Franzinated modified Craftsman 33 compressor
    Lots of other metal working tools

Similar Threads

  1. Tig Welding Table
    By knock10090 in forum TIG Welding (GTAW/GTAW-P)
    Replies: 9
    Last Post: 02-22-2015, 03:17 AM
  2. New 4' x 6' Welding Table
    By Rafael in forum Other Custom Fabrications
    Replies: 16
    Last Post: 07-16-2013, 02:23 PM
  3. My Little Welding Table
    By RP62 in forum TIG Welding (GTAW/GTAW-P)
    Replies: 2
    Last Post: 03-06-2012, 12:58 PM
  4. Combination pedal/trigger
    By todmorg in forum TIG Welding (GTAW/GTAW-P)
    Replies: 12
    Last Post: 12-07-2011, 02:59 PM

Posting Permissions

  • You may not post new threads
  • You may not post replies
  • You may not post attachments
  • You may not edit your posts
  •