Share
Results 1 to 9 of 9

Thread: Frosty looking welds with Aluminum? Everlast PowerTig 225LX

  1. Question Frosty looking welds with Aluminum? Everlast PowerTig 225LX

    Hello fellow Everlast users,

    Can you please critique my weld and offer some advice?

    I've been practicing A/C Tig welding on a 1/4" 6061 aluminum plate and my welds keep having this frosty quality. I turned the A/C Balance (cleaning) down to ~37% (almost all the way to the left) and it looks like marginally better penetration, but I want a shinier/cleaner stack-of-dimes look with better penetration. The arc starts consistently, but it doesn't seem to focus on one spot very well (frequency in the 100-120Hz range) and dances around until I start adding filler.

    Machine: PowerTig 225LX
    Torch: air cooled hand-held with switch, control in 4T position
    Gas: 100% pure argon
    cup: everlast #7 cup
    Flow: 7L / min
    Tungsten: 3/32 2% lanthanated (sharpened to point)
    Filler Rod: 3/32 4043
    Amps: (I forgot )
    PreFlow: ~1-2s
    PostFlow: ~8 seconds
    Pulse: Off

    Metal Prep: 80 grit belt sander on surface, followed by rigorous brushing with a steel brush (only used on aluminum). Then, it's cleansed with 100% cotton cloth dipped in acetone.

    The bead on the left half-way pictured was done with balance higher in the ~10 o'clock position.

  2. #2

    Default

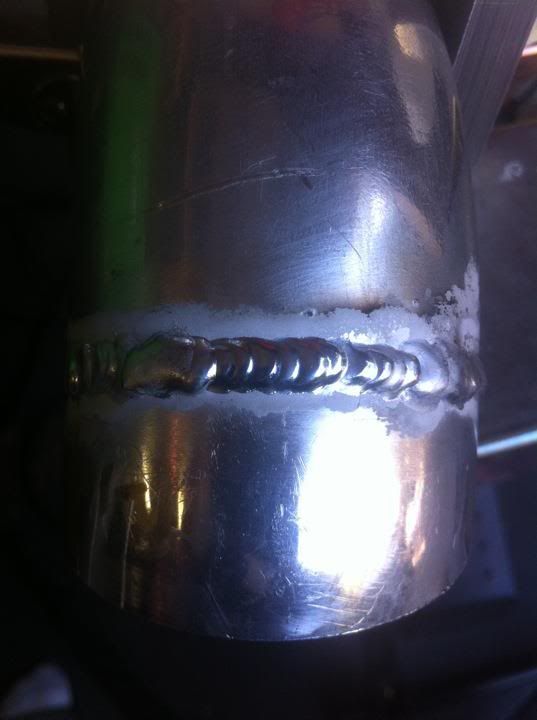
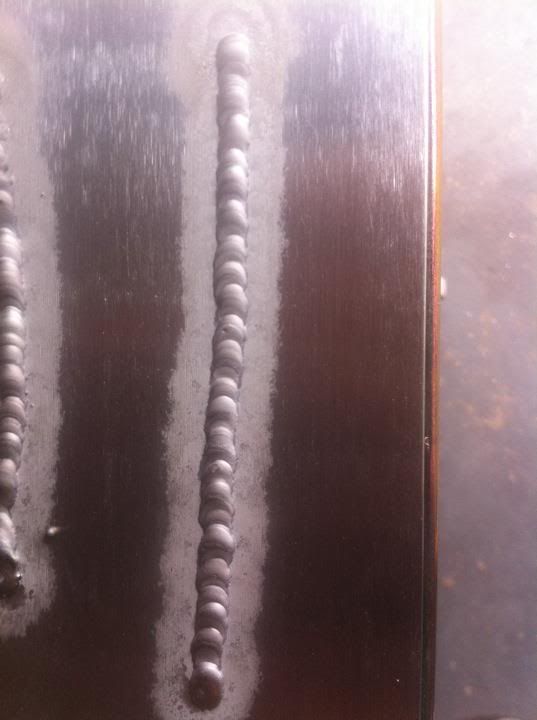
    Welding a bead on plate with 1/4" will take quite a bit of heat to get good penetration. Perhaps you are welding without enough heat and your resulting slow travel speed is causing the larger amount of etching due to hanging around too long. Also, be mindful that everytime you dip your filler, it takes energy to melt the filler. Not really of concern when welding 1/4" plate with 3/32 filler, but if you weld thin materials with relatively large diameter filler, it can be hard to manage.


    If you have some thinner (~1/8") material, I'd give that a try first for practice.

    Do you have your ground clamp directly on the material?

    Not sure that any of my comments really have anything to due with the amount of etching you are getting...
    Last edited by sportbike; 09-23-2011 at 05:03 PM. Reason: typo/spelling
    Everlast 200DX
    Everlast PT185
    Shoptask 3-in-1 (not currently in my garage, but I own it...)

    Any day on a motorcycle like this that ends just needing parts and labor is a good day.
    4.82, 158.67mph 1/8th mile 7.350, 200.35mph 1/4 mile

  3. #3
    Join Date
    Oct 2010
    Location
    Northern Virginia
    Posts
    1,323

    Default

    Quote Originally Posted by Welderooni View Post
    Metal Prep: [i]80 grit belt sander on surface, followed by rigorous brushing with a steel brush (only used on aluminum).
    Not to nit-pick small details: didn't I read that a dedicated *stainless* steel brush is recommended for aluminum?
    DaveO
    Oxweld oxy acet gear
    IMIG 200
    PowerTIG 210 EXT... Amazing!

  4. #4

    Default

    Use a smaller cup...that can help a little, if gas flow is an issue. But sportbike has hit the nail on the head. The bead should be wider for the thickness of the metal...and it would indicate you are welding too cold. You gave us everything, but the amps you are using.

  5. #5

    Default

    Yes, the amps would be a must. Also, you might want to use a water cooler to save on the torch life.
    Mike R.
    Email: admineverlast@everlastwelders.com
    www.everlastgenerators.com
    www.everlastwelders.com
    877-755-9353 x203
    M-F 12 - 7PM PST
    FYI: PP50, PP80, IMIG-200, IMIG-250P, 210EXT and 255EXT.

  6. Default

    Thanks for everyone's advice! So, I finally connected the pedal and WOW, it's so much easier welding with it on 2T setting. Here is some aluminum intercooler pipe (~2mm thick) I just did with 90 amps. I start the pedal on full, then back off to about 75-50% and it works sooo much easier than using that switch on the torch.

    I still need more practice to get my wrist in shape to keep the same distance from work piece consistent around pipe, but I'm getting there!

  7. #7
    Join Date
    Dec 2009
    Location
    Greater Seattle, WA
    Posts
    813

    Default

    First off, your weld bead looks free of contamination. It looks like you'll be able to soundly join metal with your current setup.

    You can control penetration with your weld joint prep. For example, on a butt joint, vee out a groove to fill with weld material, and wait for the puddle to melt at the bottom of the groove before melting in filler, can ensure a certain amount of penetration. Hold a tight arc and use min EP% balance to concentrate the heat at the bottom of the groove. With a corner joint, use an "open corner" prep rather than closed corner prep. For when you really want to penetrate, weld from both sides (ideal), or "keyhole" the weld from one side.

    The "frosty band" on the sides of your weld are not weld defects. If they are not acceptable for appearance reasons, you can polish them away pretty easily with some scotchbrite hand pad. If you want to reduce their width, I agree with the suggestion to try a smaller cup (such as a #5 or #6, possibly non gas lens may benefit over gas lens). Using a Helium mix will also help reducing the width of the frosty band, but that's an investment and extra cost of the Helium so may want to save it for later. The first thing to do is crank the AC balance all the way towards max penetration (max EN% / min EP%).

    But with pure argon gas, for aluminum over a certain thickness and/or overall size, you will find you have a limitation with the amount of "aluminum penetrating ability" you can achieve. If you find you are giving it 100% power (max EN% AC Balance) often and for long periods at a time, you will benefit from a Helium/Argon gas mix. Welding hotter and faster can give you a shinier bead as well as a narrower cathodic etch width.

    Generally the "hotter" you weld, the faster the travel speed, and the faster the puddle freezes, and the shinier the bead. So "hotter and faster" can make the weld beads shinier. Welding technique can play a role, in that if your piece started out cooler (IE: room temperature) the bead will freeze faster. If you just did a bunch of welding on a small piece and it's smoking hot and you go right into starting another weld bead on it, that weld bead is not going to solidify or freeze very fast.

    The metallurgy plays a part, in addition to the machine's capabilities and welding parameters used. Experimenting with the filler rod alloy (IE: 5356 vs 4043) can also get you a shinier bead appearance. I often get shinier beads with 5356 than 4043. But I have gotten some absolute mirror beads (like nothing else) using 4043 before also, so one is not superior in terms of bead shininess in all cases. There are of course many other (probably generally more important) considerations to take into account when selecting a filler rod alloy. Look at the alcotec filler rod selection chart for a bunch of considerations. It can sometimes be possible to get very shiny weld beads, but not always.

    It can take a lot of practice to get a handle on aluminum weld bead appearance, and it's as much an art as it is a science.
    '13 Everlast 255EXT
    '07 Everlast Super200P

  8. Default

    Thanks for your helpful input! Have you guys found any settings on your everlast machine that help produce a more consistent "stack of dimes" look when welding aluminum intercooler piping that is ~2mm thick (previous picture)? I understand cleaning and keeping the torch a consistent distance from the base metal is vital, but any other tips/tricks would be great!

  9. #9

    Default

    Turn on pulse. Set Hz to minimum. Set all other pulse settings to 50%. That will get you started. Move consistently and dab consistently.

Similar Threads

  1. Help with spoolgun aluminum welds
    By zoama in forum MIG Welding (GMAW/GMAW-P/FCAW)
    Replies: 43
    Last Post: 06-11-2017, 05:12 PM
  2. johnnyfive says hello from Lancaster, PA. Everlast PowerTig 225LX
    By johnnyfive in forum Introduce Yourself
    Replies: 19
    Last Post: 12-21-2012, 01:05 PM
  3. Post your best aluminum welds!
    By TonyR85 in forum Other Custom Fabrications
    Replies: 13
    Last Post: 03-30-2011, 04:48 AM
  4. First aluminum welds with PT200DX
    By sixturbosix in forum TIG Welding (GTAW/GTAW-P)
    Replies: 1
    Last Post: 09-26-2010, 06:00 PM
  5. aluminum tig welds w/ 250P
    By bmichaelk in forum Customer Testimonials
    Replies: 4
    Last Post: 03-31-2009, 03:48 PM

Posting Permissions

  • You may not post new threads
  • You may not post replies
  • You may not post attachments
  • You may not edit your posts
  •