Share
Page 10 of 13 FirstFirst ... 89101112 ... LastLast
Results 181 to 200 of 251

Thread: Plasma Table Build - Plasma Bot 4.0

  1. #181
    Join Date
    May 2012
    Location
    Disneyland
    Posts
    2,662

    Default

    Quote Originally Posted by SeanMurphy265 View Post
    The Z axis I have set +0 is the torch dead on the table. Any negative -1.-2,-3, etc has the torch moving up (safe Z).
    That is backwards. Z up is positive and down is negative.

    You do have X and Y swapped, if you want what is on your screen to match what you see on the table. I can't tell how the S is coming out from the video so I'm not sure what you mean by backwards, as that is the only letter that will not mirror.

    You can tell if your axis are correct with jogging and watching your position display. X is left and right, negative to the left and positive to the right. Y is positive towards you and negative away from you. Z is Positive going up and negative going down.

    Click image for larger version. 

Name:	Axis.JPG 
Views:	427 
Size:	16.1 KB 
ID:	7752
    Last edited by Rambozo; 08-28-2012 at 10:09 PM. Reason: Added picture instead of 1000 words
    Long arc, short arc, heliarc and in-the-dark!

  2. #182

    Default

    Hi Sean
    I made a pen holder that fits in my torch holder so I can run routines and see what it looks like on paper. It also gives you a way to check the dimensions of the part cut. See the attached pictures of what I made and it has a spring in it and works with the floating head torch head.
    Have fun
    Tom
    Attached Thumbnails Attached Thumbnails Click image for larger version. 

Name:	cnc pen checker (3).JPG 
Views:	782 
Size:	81.0 KB 
ID:	7753   Click image for larger version. 

Name:	cnc pen checker (4).JPG 
Views:	567 
Size:	53.2 KB 
ID:	7754   Click image for larger version. 

Name:	cnc pen checker (7).JPG 
Views:	985 
Size:	133.0 KB 
ID:	7755  

    Everlast PM256
    Millermatic 180
    Hypertherm PowerMax 65 with machine torch
    Longevity Force Cut 80I
    DIY CNC table for plasma/routing
    13" metal lathe
    Small Mill
    ect, ect.

  3. #183
    Join Date
    May 2012
    Location
    Disneyland
    Posts
    2,662

    Default

    I looked at SheetCAM and it looks like some nice software for this kind of work. I'll have to play with it some. I see you can setup your machine in that software so that you can make your origin anywhere and have it show your table size as well as working area and material size. So you can really set your machine up however you want, for the different axis and home positions, but the one thing that you can't set is the direction of the motors. You will have to make that right in Mach3. I guess it all depends on what side you load your machine from and where you watch from as to how you want your X and Y.

    BTW I forgot that by default Mach3 uses incremental arc centers so the code I posted before wasn't right for Mach. That is one of the things that the postprocessor takes care of for you. This is what it should have been.
    Code:
    (With zero in the lower left:)
    G0X0Y0 (Rapid to zero home position)
    G1X0Y1F20 (First line vertical @ 20 inches per minute)
    G1X1Y2 (Angled line)
    G2X1Y0I0J-1 (Curved line)
    G1X0Y0 (Last line horizontal)
    
    (With zero in the upper left:)
    G0X0Y-2
    G1X0Y-1F20 
    G1X1Y0 
    G2X1Y-2I0J-1
    G1X0Y-2
    
    (With zero in the middle:)
    G0X-1Y-1
    G1X-1Y0F20 
    G1X0Y1 
    G2X0Y-1I0J-1
    G1X-1Y-1
    Sorry if that was confusing.
    Long arc, short arc, heliarc and in-the-dark!

  4. #184

    Default

    I like that pen holder, that could come in handy. You could draw out patterns on paper or cardboard.

    Your right about sheet cam. For someone who has no experience with CNC and cam software it is fairly easy to pick up. Right now I have the table set up for the lower right hand corner because thats the location coordinates 0,0. The current setup is probably fine for running a single part, but it needs to be in the lower left hand corner. That would match the cad and cam software. I could change sheetcam to start in the lower right corner to match the current setup, but I want it to be right.

    Thanks for all the help.
    Lincoln Eagle Engine Drive
    Everlast MTS 250
    Everlast Power Tig 225lx
    HTP Mig 2400
    Everlast Power Plasma 60C --> Just need to finish my CNC Plasma Table!
    Miller Spectrum 375 Extreme Plasma cutter
    Victor cutting torch
    HF 20 Ton Shop Press
    HF 4x6 Band Saw
    HF Air Compressor
    Northern Tool Drill Press


    www.murphywelding.com

  5. #185
    Join Date
    May 2012
    Location
    Disneyland
    Posts
    2,662

    Default

    I think you might be missing the point. Once you have your directions right, you can move the origin around from job to job between SheetCam and Mach and nothing will change. But right now you have a direction or two that are reversed. There are times where having the origin in a different place is real handy. Like if you have a part to cut that has some existing cuts or other things you have to line up on, like drilled or tapped holes. It's just more tools in your toolbox, as someone likes to say. Just imagine how you want your computer screen to lay on the table and that will tell you what your axis and directions need to be.

    Yeah, a pen holder can be handy at times.

    Click image for larger version. 

Name:	Pen.JPG 
Views:	506 
Size:	30.5 KB 
ID:	7756

    If you want to draw blueprints or patterns just dial your kerf setting down to zero and don't use lead-ins and you have made a nice plotter.

    Have you seen these? They are kinda basic, but they show some of the possible machine setups.
    This guy has his axis with X as the short one and Y for the long since he works from the short end of the table. But you can see that if you use that direction, use lose a lot of screen area for your metal since the monitor is wider than tall.
    http://www.youtube.com/watch?v=hk7WNZ-erY8
    http://www.youtube.com/watch?v=ODyK90hh3YE
    http://www.youtube.com/watch?v=ue8BtibfeKk
    http://www.youtube.com/watch?v=dekJVglKCgI
    http://www.youtube.com/watch?v=R9YvM841u4c
    Long arc, short arc, heliarc and in-the-dark!

  6. #186

    Default

    Rambozo
    Thanks for posting the sheetcam videos I was trying to make up my mind about buying it, this helps.
    I had played with it but had not set it up so it did not work (now I see why duh!!!)
    have fun
    Tom

    Everlast PM256
    Millermatic 180
    Hypertherm PowerMax 65 with machine torch
    Longevity Force Cut 80I
    DIY CNC table for plasma/routing
    13" metal lathe
    Small Mill
    ect, ect.

  7. #187

    Default

    http://www.youtube.com/watch?v=v5zQkGVCpIs

    I watched those videos and this one also. I finally had to take notes so I could remember everything. I think the trial software gives you 50 lines of gcode for three months maybe.
    I played around with lazy cam and it seems to be pretty good, but sheet cam is better for router/mill and plasma cutting. I like how you can do the various layers for the different cuts (inside, outside, holes). I played with sheetcam a bunch and generated gcode with the different features added each time. I also like it you can place the part on the table and measure the coordinates, and the torch will move to the part. It was worth the added expense. If I ever get my table making money I'm going to build a small router/mill for aluminum.
    Lincoln Eagle Engine Drive
    Everlast MTS 250
    Everlast Power Tig 225lx
    HTP Mig 2400
    Everlast Power Plasma 60C --> Just need to finish my CNC Plasma Table!
    Miller Spectrum 375 Extreme Plasma cutter
    Victor cutting torch
    HF 20 Ton Shop Press
    HF 4x6 Band Saw
    HF Air Compressor
    Northern Tool Drill Press


    www.murphywelding.com

  8. #188

    Default

    HI Guys
    Some info about the videos on sheetcam, I just bought Sheetcam and found out the videos are from an older version of sheet cam.
    I'm sure the info on the videos can be used but the menus have changed with the newer Sheetcam program.

    Have fun
    Tom

    Everlast PM256
    Millermatic 180
    Hypertherm PowerMax 65 with machine torch
    Longevity Force Cut 80I
    DIY CNC table for plasma/routing
    13" metal lathe
    Small Mill
    ect, ect.

  9. #189

    Default

    You are correct, but the videos will get you cutting (in theory, I'm on vacation I hope to cut Monday, but probably Tuesday.
    Lincoln Eagle Engine Drive
    Everlast MTS 250
    Everlast Power Tig 225lx
    HTP Mig 2400
    Everlast Power Plasma 60C --> Just need to finish my CNC Plasma Table!
    Miller Spectrum 375 Extreme Plasma cutter
    Victor cutting torch
    HF 20 Ton Shop Press
    HF 4x6 Band Saw
    HF Air Compressor
    Northern Tool Drill Press


    www.murphywelding.com

  10. #190

    Default

    Did you end up using limit swithes?

    I think I read that Mach uses limit switches to correct any racking (misaligment of motors on the long axis). So, I'm under the impression that placement of the limit switches must be exact.

    I'm looking for hints on how to make sure they are lined up appropriately.
    Just starting in Aug '10
    ---
    Hobart Handler 187
    Power Plasma 50

  11. #191
    Join Date
    May 2012
    Location
    Disneyland
    Posts
    2,662

    Default

    Quote Originally Posted by EmptyNester View Post
    Did you end up using limit swithes?

    I think I read that Mach uses limit switches to correct any racking (misaligment of motors on the long axis). So, I'm under the impression that placement of the limit switches must be exact.

    I'm looking for hints on how to make sure they are lined up appropriately.
    I believe what you are talking about are home switches. True limit switches trigger the E-Stop, while home switches allow the control to go to a repeatable position. There needs to be as little slop in that switch setup as possible. You can use a dial indicator to verify that the position repeats. As far as getting both motors on the same axis to be in sync, you will need to check that your axis are 90 degrees from each other. The best way would be to take the measurements of a large triangle marked out on the table. Then you could setup home switches for each motor so that the gantry always returns to a square state before starting a program. That is one problem with open loop type stepper systems. If anything binds or exceeds the torque of the motors, you could drop a step or more. Just make sure everything is smooth and that your motors are drawing as little power as possible.

    Here is one way to setup a limit switch so that it can be adjusted a little bit.

    Click image for larger version. 

Name:	LimitSwitch.JPG 
Views:	493 
Size:	61.0 KB 
ID:	7793
    Last edited by Rambozo; 09-04-2012 at 02:09 PM.
    Long arc, short arc, heliarc and in-the-dark!

  12. #192

    Default

    I did not use limit switches (not yet anyway). I hope to get some time to make a cut today. I've done a little sharpie marker test and everything seems to be close. As I was building my table I constantly checked to make sure everything was squared, and that made it easier at the end. When I mounted the gantry it just about aligned itself. I played with it some to check it out, and it would not move if I purposely moved the gantry out of align. I mounted my carriages on first with all the bearings, and then mounted the gantry on to the carriages. I also checked my X distance, but honestly it seemed to align itself, because my setup would bind up if it were not aligned.
    Lincoln Eagle Engine Drive
    Everlast MTS 250
    Everlast Power Tig 225lx
    HTP Mig 2400
    Everlast Power Plasma 60C --> Just need to finish my CNC Plasma Table!
    Miller Spectrum 375 Extreme Plasma cutter
    Victor cutting torch
    HF 20 Ton Shop Press
    HF 4x6 Band Saw
    HF Air Compressor
    Northern Tool Drill Press


    www.murphywelding.com

  13. #193

    Default

    I tried to make my first cut tonight, and I can't get my torch to fire PP60C from MACH3. I tried the F5 key and also ran some gcode and the torch never fired. As I run the code you can see the torch light come on in MACH3. I did not have time to check the wiring. Does it matter how the relay is wired to the cnc port on my pp60c?

    CNC Port wiring
    The relay board that will be wire to the start stop pins (1 & 2) on the CNC port.
    (5&7) on the CNC port are + & -

    The relay is wired on page 14 of this thread (pins 3 &4)
    Pins 1&2 came pre wired to something else.

    Breakout board wiring
    THC wired to the breakout board pins 10, 11, 12, and the negative for the common on the THC.
    10 - arc on
    11 - up
    12 - down and configured in Mach 3
    Lincoln Eagle Engine Drive
    Everlast MTS 250
    Everlast Power Tig 225lx
    HTP Mig 2400
    Everlast Power Plasma 60C --> Just need to finish my CNC Plasma Table!
    Miller Spectrum 375 Extreme Plasma cutter
    Victor cutting torch
    HF 20 Ton Shop Press
    HF 4x6 Band Saw
    HF Air Compressor
    Northern Tool Drill Press


    www.murphywelding.com

  14. #194
    Join Date
    May 2012
    Location
    Disneyland
    Posts
    2,662

    Default

    When you send a torch on command, do you hear the relay on your relay board click? Does your breakout or relay board have LEDs for the various signal lines?
    Long arc, short arc, heliarc and in-the-dark!

  15. #195

    Default

    If you want a quick check on the torch on/off in Mach 3 just go to the MDI display and type in M3 return and the torch will come on then M5 to turn it off.
    If it don't work there is a electrical problem in how the torch is wired. Pins 1 & 2 on the cnc connector is a dry contact (just short them to trun the torch on, open for off)
    Also in Mach 3 ports & pins, spindle control, relay control make surre no check in relay disable box and there you can change the output pins for the torch control.
    have fun
    Tom

    Everlast PM256
    Millermatic 180
    Hypertherm PowerMax 65 with machine torch
    Longevity Force Cut 80I
    DIY CNC table for plasma/routing
    13" metal lathe
    Small Mill
    ect, ect.

  16. #196

    Default

    Quote Originally Posted by Rambozo View Post
    When you send a torch on command, do you hear the relay on your relay board click? Does your breakout or relay board have LEDs for the various signal lines?
    Yes it does have LED's.
    Here is the link to the manual
    http://www.probotix.com/manuals/RBX-1_manual.pdf

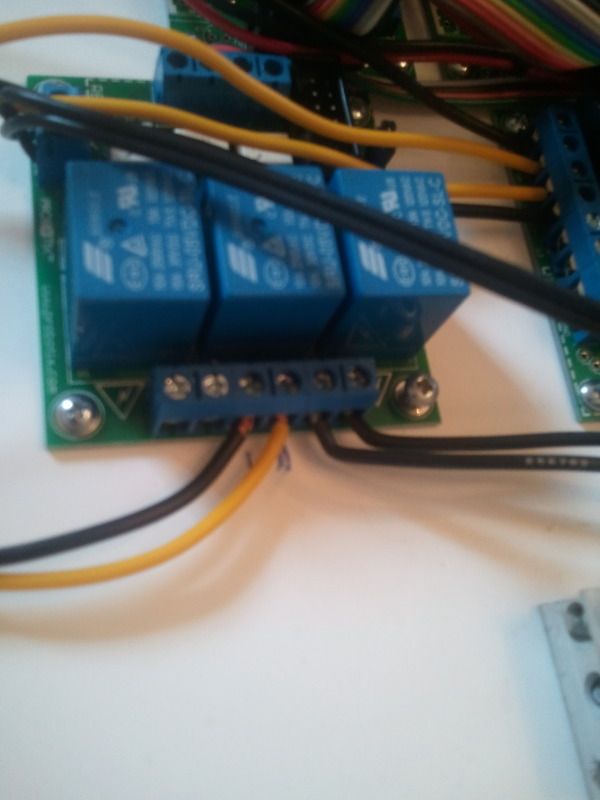
    I think it's not wired correctly. The yellow and black wires are 1 and 2 on the cnc port. They had me wire the torch on and off to the 2 and 3 pins on the other ac/dc circuit side (right hand side according to the manual). I'm thinking that it's not making the loop, and that either cnc port (on pp60c) pins 1 or 2 need to be moved to the relay 1,2,3 side. In other words the ac or dc circuit is the input and the relay 1,2, or 3 is the output.

    I will also check mach3 to make sure the relays are not turned off.


    Lincoln Eagle Engine Drive
    Everlast MTS 250
    Everlast Power Tig 225lx
    HTP Mig 2400
    Everlast Power Plasma 60C --> Just need to finish my CNC Plasma Table!
    Miller Spectrum 375 Extreme Plasma cutter
    Victor cutting torch
    HF 20 Ton Shop Press
    HF 4x6 Band Saw
    HF Air Compressor
    Northern Tool Drill Press


    www.murphywelding.com

  17. #197

    Default

    It look like the output is connected to the orange wires for the lower relay, if you have an ohm meter you can check to see if it’s working. Hook the ohm meter to the orange output connections and hook the orange connection to the output of your controller and ground to the black connection unless you are using the PBX-FF connector. Use the trigger I talked about above in Mach3 (m3 on m5 off) the ohm meter should show a short (0.0 ohms) when M3 is entered and no ohms when M5 is triggered. If you get 0 ohms (short ) when checking then the problem is at the CNC connector on the PP60C. If you are not working the relay then it’s in Mach3 or the hook up with your controller. Zero ohms and no ohms are not the same, zero ohms is like the leads on the meter are connected to each other and no ohms is like no connections at all. Another way is 0 ohms is relay contacts closed and no ohms the relay is not turned on.
    Just trying to help
    Tom
    P.S. you want to use the lower or middle connection and relay for the torch LED #1 should be lit if you at triggering the relay. Are you supplying +5 volts to the circuit board??

    Everlast PM256
    Millermatic 180
    Hypertherm PowerMax 65 with machine torch
    Longevity Force Cut 80I
    DIY CNC table for plasma/routing
    13" metal lathe
    Small Mill
    ect, ect.

  18. #198
    Join Date
    May 2012
    Location
    Disneyland
    Posts
    2,662

    Default

    If you trigger the torch in Mach and the LED comes on, you know that communications between your computer, Mach, and the board are ok. So then you know the problem is in the relay or post relay wiring. If the LED does not come on, then you have something to fix between your computer, Mach and the board.

    Since all this is new and untested, you could always have more than one problem, so it's good to take an ordered approach to trouble shooting. Have you shorted pins 1 and 2 on the PP60 to verify that it is all ok? You can also check the relay contacts like Tom described. If both the LED comes on and the PP60 works, that could be your issue. I prefer to start at one end and follow the signal to the other. You know Mach at least thinks it's sending the signal because it lights the torch on display.
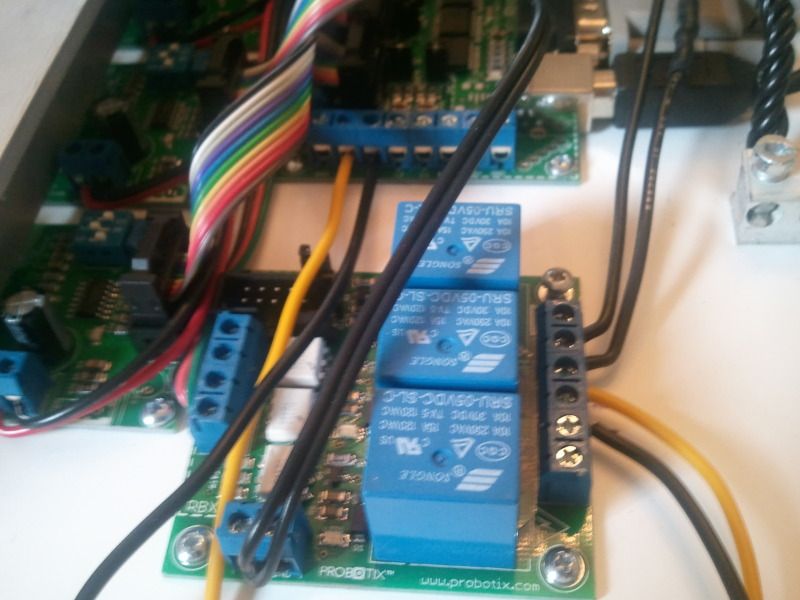
    Checking for power into the board is a good idea, too. Check with a meter and make sure your polarity is right, because I see you used two black wires to supply power to the board, so maybe they got swapped around.
    Long arc, short arc, heliarc and in-the-dark!

  19. #199

    Default

    I was going to call probotix today, but I've been sick all day. I have not looked to see if the led comes on when I trigger the torch in Mach3. I have not shorted pins 1 and 2 on the torch. If I'm feeling better I may give it a try.

    The two black wires at the bottom of the second pic are the 5 volts.

    I wired the torch trigger the way tech support told me to wire it, but I'm thinking they told me wrong. I wired the torch the yellow and black wires to the two pins marked yellow on page 2 of the manual. I'm thinking that one of those wires needs to go to the relay #2 switch marked yellow on page 2 of the manual link.

    I'm still going to check everything before I do any switching of wires. I probably will ohm that yellow 2 relay on the left hand side of the board.
    Lincoln Eagle Engine Drive
    Everlast MTS 250
    Everlast Power Tig 225lx
    HTP Mig 2400
    Everlast Power Plasma 60C --> Just need to finish my CNC Plasma Table!
    Miller Spectrum 375 Extreme Plasma cutter
    Victor cutting torch
    HF 20 Ton Shop Press
    HF 4x6 Band Saw
    HF Air Compressor
    Northern Tool Drill Press


    www.murphywelding.com

  20. #200
    Join Date
    May 2012
    Location
    Disneyland
    Posts
    2,662

    Default

    Quote Originally Posted by SeanMurphy265 View Post
    I was going to call probotix today, but I've been sick all day. I have not looked to see if the led comes on when I trigger the torch in Mach3. I have not shorted pins 1 and 2 on the torch. If I'm feeling better I may give it a try.

    The two black wires at the bottom of the second pic are the 5 volts.

    I wired the torch trigger the way tech support told me to wire it, but I'm thinking they told me wrong. I wired the torch the yellow and black wires to the two pins marked yellow on page 2 of the manual. I'm thinking that one of those wires needs to go to the relay #2 switch marked yellow on page 2 of the manual link.

    I'm still going to check everything before I do any switching of wires. I probably will ohm that yellow 2 relay on the left hand side of the board.
    Hope you feel better, soon.

    Yes the torch does need to wire to the two terminals that have yellow wires in the manual. Those pins short when the relay is energized. Do not wire loads to the relay #2 Ctl (+5V) terminal, that is the input from your breakout board. I can't see all your wires so you might make a little sketch of how you have things hooked up.

    But the job of this board is to switch high powered loads and protect your breakout board and computer port. The output from a computer can only power a small LED, even test light can burn them out. So this board does the high powered switching. The opto-isolation part means that the switching is done with light, inside the chips, so there is no electrical connection between the inputs and outputs. When +5V is applied to an input, the corresponding two output lines are shorted.

    So you should have a wire from your breakout board outputs to the Relay #2 Ctl (+5V) And your CNC plug pins 1 and 2 should be wired to the two terminals that have yellows wires and are marked Other AC or DC Circuit.

    BTW what are you using Relay #3 for?

    Here is a question.
    Click image for larger version. 

Name:	Wiring2.JPG 
Views:	652 
Size:	79.4 KB 
ID:	7797

    This is how the input and output should be connected. I left off the power lines, but those need to be there and be correct for + and -.
    Click image for larger version. 

Name:	Wiring.jpg 
Views:	886 
Size:	34.7 KB 
ID:	7798
    Long arc, short arc, heliarc and in-the-dark!

Similar Threads

  1. Official start to CNC plasma table build
    By Rockyhud in forum Everlast Plasma Cutters (PAC)
    Replies: 3
    Last Post: 02-22-2017, 04:44 PM
  2. CNC plasma table build
    By acourtjester in forum Automated welding system (CNC), Submerged ARC, etc.
    Replies: 22
    Last Post: 08-31-2015, 04:57 PM
  3. Who has a plasma table?
    By SeanMurphy265 in forum Everlast Plasma Cutters (PAC)
    Replies: 16
    Last Post: 03-27-2012, 01:28 PM
  4. CNC Plasma cutter-The build begins.
    By hooda in forum Personal Projects (no welder required)
    Replies: 3
    Last Post: 03-16-2012, 09:18 PM
  5. CNC Plasma Table?
    By SeanMurphy265 in forum Everlast Plasma Cutters (PAC)
    Replies: 13
    Last Post: 02-27-2012, 01:37 PM

Posting Permissions

  • You may not post new threads
  • You may not post replies
  • You may not post attachments
  • You may not edit your posts
  •