Share
Page 1 of 3 123 LastLast
Results 1 to 20 of 43

Thread: Another new guy from WA

  1. #1

    Default Another new guy from WA

    Hi, my name is Bob and I fabricate for a hobby... (hi, bob)

    It all started when I was around 4 years old. My dad was a farm boy from rural Missouri, who moved to the big city (St. Louis) when he graduated high school. Growing up on a small family farm, they couldn't afford new equipment or even to pay someone to maintain the old equipment they had. As a result, Dad worked on everything from tractors, to bailers, to trucks, to manure spreaders. A lot of time they couldn't even afford new parts and had to either repair the parts that broke, or fabricate replacments from whatever they had or could get their hands on. As a result, Dad became a real jack of all trades who could figure out a way to make or fix just about anything.

    At the tender age of 4, Dad started taking me out to the garage with him whenever he had to work on one of the vehicles, and insisted I tag along to "help" with every project - whether it was rebuilding an engine or tranny, doing carpentry, plumbing repairs, electrical wiring, or fabricating something. I inherited at least some of his natural aptitude and have been repairing, fabricating, or building things ever since. That was 43 years ago.

    These days I'm an engineer for a large corporation and only get do automotive repairs, modifications, and fabrication as a hobby. I have two boys of my own now and am trying to do the same type of thing with them that Dad did with me, making them hang around to "help" me when I'm working in the garage (or at anything else). Mainly so that they have the chance to learn how to do things - the same way I did. We're into offroading Jeeps and I don't buy anything that I can fabricate myself. Suspension and lift parts, bumpers and body armor, roof rack, etc. I design and build it all myself.

    My current project is an 84 Jeep Cherokee that I am swapping a diesel engine into. The engine is a 4.3 liter V6 from a front wheel drive 84 Olds Cutlass Ciera. Since it was designed to be transverse mounted and I am putting it into a Jeep where it is longitudinally mounted, there is a considerable amount of fabrication to be done. Mainly in the areas of the motor mount system and the exhaust. Mounting it is going to include fabricating a custom cross-member and motor mounts. I also have a turbocharger I plan on installing, which further complicates the design of the exhaust manifolds and piping.

    I have a 220v SMAW and a 120v wire feed welder (gas or gasless) both are older, private label units made by Century. For cutting I have an oxy-acetelene torch, chop saw, band saw, and the usual assortment of grinders & cutting disks. This diesel conversion project requires cutting some pretty complex shapes out of fairly thick stock. Too complex and too thick for a hand grinder, and I don't want the additional complication of heat distortion that comes from cutting with a gas torch. So, that is what convinced me it was time to pony up and buy myself a plasma cutter as an early Christmas present.

    I waited nearly 3 weeks for their latest shipment to arrive before placing my order, but I placed my order with Alex on Friday after he got back from the FabTech show. I got busy at work that day and forgot to even call him until around 3 pm, so I didn't expect the unit to ship until Monday. Imagine my suprise when I got home from work on Tuesday and there it was! I've been too busy to do anything more than assemble it so far, but my shiny new 2010 model SuperCut 50 is sitting here in the family room patiently waiting for me to take it out to the garage and fire it up. I look forward to doing just that on Friday after tomorrow's family festivities are over.

    So, its kinda' long and rambling, but that's my story, and I look forward to getting to know some of the folks around here.
    Last edited by R Counts; 11-26-2009 at 06:21 AM.

  2. Default

    which machine did you purchase?

    that Olds had a FWD 4.3V6 diesel? Is that the same 4.3 GM V6 that was in so many trucks and SUVs, but in a diesel configuration? I've never heard of that setup before.

    I have always been partial to the jeep cherokees. I learned to drive stick in my dad's 84 Cherokee. I can't even count how many cherokee and grand cherokees have flowed through my family since 1984. The last one was my wife's 2000 Cherokee Limited.....the last year they were produced. (she still misses that little SUV.)

  3. #3

    Default

    Quote Originally Posted by BurningMetal View Post
    which machine did you purchase?
    I edited my first post to include that detail. I got one of the new model SuperCut 50 units. I already have the welding gear I need, so it didn't make sense to spend the extra for a combo unit - especially since I don't know how to TIG anyway.

    Quote Originally Posted by BurningMetal View Post
    that Olds had a FWD 4.3 V6 diesel? Is that the same 4.3 GM V6 that was in so many trucks and SUVs, but in a diesel configuration? I've never heard of that setup before.
    Nope, the two engines have nothing in common other than being 4.3 liters in displacement. The 4.3 does have some things in common with the diesel 350 V8 of the same era - it uses the same pistons, rings, conn rods, crank and cam bearings, injectors, glow plugs, and a 6-port version of the same injection pump. Other than that it has nothing in common with any other GM engine. They only produced it for 3 years, 84, 85, & 86. It was only put into 4 or 5 percent of the Cutlasses, 98s, Pontiac 6000s, and Buick leSabers those 3 years. So they are a fairly rare motor. I have 2 complete runnable motors and a third that is complete and runnable except for lack of an injection pump. So I'm pretty well stocked with good usable parts to keep it running once the conversion is complete. You can still buy most of the wear-out parts and gaskets too - you just have to special order them and wait for them to arrive.

    Quote Originally Posted by BurningMetal View Post
    I have always been partial to the jeep cherokees. I learned to drive stick in my dad's 84 Cherokee. I can't even count how many cherokee and grand cherokees have flowed through my family since 1984. The last one was my wife's 2000 Cherokee Limited.....the last year they were produced. (she still misses that little SUV.)
    I own 1 Grand Cherokee and 3 Cherokees right now, and I just scrapped a fourth, so I guess you could say I'm a little partial to them myself...
    Last edited by R Counts; 11-26-2009 at 06:07 AM.

  4. #4

    Default

    Welcome aboard R Counts,

    Your story is a lot like mine other than a third boy and Fords, carts, quads, etc.

    I have been look for a Jeep for my 14 year old. But not sure if they are hard to work on. The older model Fords are a dream to work on and run forever.

    In my area there are lots of Jeeps for sale on Craigslist for what looks to be very good prices.

    On TIG, once you've TIG'd you'll be hooked. So don't let a friend talk you into trying theirs of you will wish you bought the combo. I actually like my plasma and TIG separate. Allows swapping back and forth easier for us old guys.
    Mike R.
    Email: admineverlast@everlastwelders.com
    www.everlastgenerators.com
    www.everlastwelders.com
    877-755-9353 x203
    M-F 12 - 7PM PST
    FYI: PP50, PP80, IMIG-200, IMIG-250P, 210EXT and 255EXT.

  5. #5

    Default

    Welcome to the forum. Glad to have you on board. Engineer, electrical or mech? I second the tig. You may want to learn some time, it's great for the turbo plumbing and small detail parts. How about some pictures of the Jeep projects? How old are your sons? Mine kids are too old to follow me around HAHA!
    Wayne

  6. Default

    Welcome to the Forum
    So we have another Offroader on here. Great
    I tend to do the same with parts if i can make it why bother buying it.
    Cherokees are nice and i do wheel with a few Xjs and ZJs but i am a Landie enthusiast.
    My lift Dislocation cones underbody armour sliders bumpers are all homemade. and a ton of other bits and pieces have been added over the years. New OBA system in December . I used to use a 3/4 twin head compressor but after making the Compressor winch i decided to treat myself to it and now run the tank directly from the winch . It never ends once you start
    Cheers

  7. #7

    Default

    Another welcome, Would like to see some project pics also! Sounds like there's a lot of fab work ahead!
    POWERMASTER 205 AC/DC Pulse TIG, Plasma and Stick

  8. Default

    Hey Bob

    You make a lot more sense to me after reading that, pretty cool. Ive been raised pretty much the same.

    If you wanna try the TIG thing sometime, let me know and we'll arrange it

  9. #9

    Default

    Thanks for the warm welcome guys!

    Sorry I haven't posted anything yet, but I've been down with the flu since Thursday night. I haven't even had a chance to fire up the new unit yet. I'm just now recovered enough that I plan on going back to work tomorrow.

    I should get a chance to try out the new SuperCut50 this weekend. First order of business will be the crossmember and motor mounts. Then the exhaust manifolds. I've already drawn up the plans for fabbing the manifolds out of 1-1/2" x 4" x 1/8" wall rectangular tubing. They may end up looking a little odd, but due to the very limited clearance space available, the rect tube is going be the best option for making manifolds with the highest flow-volume that will fit in the space available.

    I have all the material I need, its just a matter of having the time to do the work. I have only taken a few pictures so far, since I really haven't done any significant fab work yet - just a support bar that the engine is currently hanging from. I'll be sure to keep the camera handy and take lots of pictures as I go along. I'll start a separate fabrication thread once I have more to post. Stay tuned...

  10. #10

    Default

    Hi Bob,
    Please don’t take my advice as an insult but rectangular tubing does not support air flow very well. It diminishes the material vortex flow that aides in the flow of fluids (for all intensive purposes air is considered a fluid when designing). If you cannot use round tube then oval is the next best. If you are going to use rectangular then try to get the largest corner radius you can. The general rule is the least amount of bends, largest radius permissible and the shortest route possible. Sometimes with turbochargers too large of a tube may reduce velocity causing slow spool up. Good luck with the project and keep us posted. It sounds like an interesting vehicle you are building. I would like to build a small diesel with an 8 speed auto in an old street rod pick up. That’s right behind my other projects!
    Wayne

  11. #11

    Default

    Quote Originally Posted by WAYNESWORLD View Post
    Hi Bob,
    Please don’t take my advice as an insult but rectangular tubing does not support air flow very well. It diminishes the material vortex flow that aides in the flow of fluids (for all intensive purposes air is considered a fluid when designing). If you cannot use round tube then oval is the next best. If you are going to use rectangular then try to get the largest corner radius you can. The general rule is the least amount of bends, largest radius permissible and the shortest route possible. Sometimes with turbochargers too large of a tube may reduce velocity causing slow spool up. Good luck with the project and keep us posted. It sounds like an interesting vehicle you are building.
    No insult taken. I've taken fluid dynamics and recognize the validity of all of your observations.

    The problem is that I am putting a tall-decked 90* V-block into an engine compartment designed for a low-decked 60* V-block. That means the distance between the exhaust ports and the "frame rails" is only 2-1/2" to 3". The ports are 1-3/4" square and are arranged with two right next to each other (separated by a 1/4" divider) in the front on the driver's side head and the 3rd port at the back of the head. The passenger side is just the opposite with two together at the rear end of the head and the third port up front. The original manifolds have the "paired" ports on each side dumping into a common collector and piped to connect with the outlet of the third port.

    I've looked at using 1-3/8" mandrel bent tubing. The tightest radius I've been able to find is 2" u-bends from Summit or Jegs. So if I were to make the flanges out of 1/4" bar, the 1-3/8" pipe with a 2" radius bend and the 1/4" flange adds up to needing 3-7/8" clearance, and it just isn't there. I can reduce that by a little by cutting wedges out of the 90* bends to reduce the radius to less than 2", but of course every wedge cut out of the bend creates a seam and break in the flow. Even with tightening up the radius there's no way to get the required clearance down to under 2-1/2".

    There are a couple of other alternatives I've considered. One is to raise the engine a couple of inches higher. That would require modifying the hood to provide clearance - something like a LARGE, wide hood scoop. By wide I mean half the width of the hood. Unfortunately, with rain 200 days a year here in western Wasington, that isn't a very practical solution.

    The last alternative is to modify the frame rails to add clearance. Given that the Cherokee is a uni-frame and the frame members are made by layering and spot welding together heavy-gauge sheet metal stampings, I'm not very enthusiastic about the prospect of cutting on them and then trying to reinforce them to make up for it. Particularly since they are going to be supporting an engine about 50% heavier than what they were designed to support in the first place.

    I arrived at using 4" x 1-1/2" rect tube as the main collector because it will give me the maximum cross-sectional area (6 sq in) relative to the cross-sectional area of the 3 ports (which add up to just over 9 sq in combined). Compare that to using the 1-3/8" tubing - 3 of which would only give a cross-sectional area of just under 4-1/2 sq in combined. I think that having 1/3 more volumetric capacity (6 sq in vs. 4-1/2 sq in) should more than make up for the less than optimal flow.

    Probably the most significant benefit of all is that I can also weld the square tube directly to the flanges and end up with an assembly that only requires 1-3/4" clearance (1/4" flange and 1-1/2" tube). While the square tube won't give the best flow - due to the lack of swirl (vortex) action, it should give fairly decent laminar flow, particularly with the rounded corners I am incorporating into the design. It will also be transitioning to conventional round exhaust pipe as quickly as possible.

    One other thing to keep in mind is that the exhaust flow from BOTH manifolds is eventually all going to be squeezed down through a single 1-3/4" x 2-3/4" opening (just over 4 sq in) at the turbo input flange. Compared to the restriction of going through that small of an opening, the negative effects of the non-vortex flow upstream of that point should pale to insignificance by comparison.
    Last edited by R Counts; 12-02-2009 at 06:58 AM.

  12. #12

    Default

    Well, between having to work half a day on Saturday and spending Sunday doing oil changes and necessary maintenance on our daily driver vehicles I still haven't had a chance to try the new plasma cutter

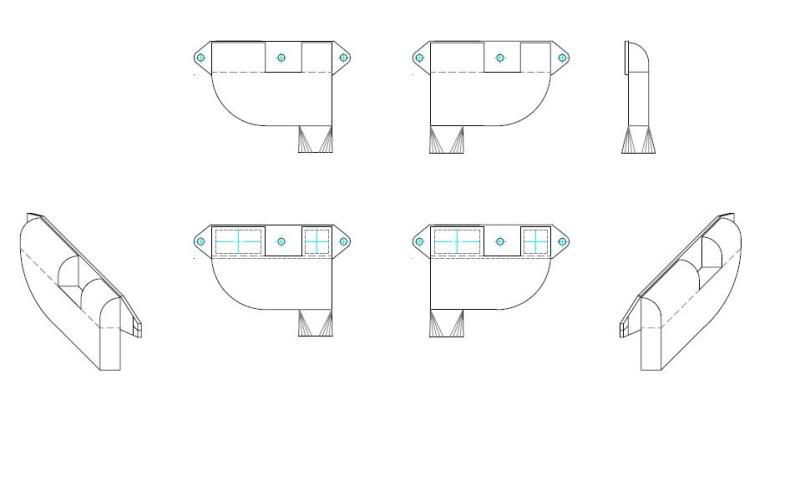
    While I was at work on Saturday I finished the AutoCAD drawing of the manifolds. Here's what I was trying to describe above. I couldn't quite figure out how to draw the exit pipes at the bottom back corner of the manifolds in the ortho views (bottom left and bottom right drawings below). I never was that good at drawing in ortho mode...

    Anyway, it will be a short piece of 2.5" round pipe that will transition from 2.5" diameter round on the bottom end to a 1.5" x 2.4" rectangle on the top end and then the rectangular end will be welded to a hole of the same size in the bottom back corner of each of the 1.5" x 4" main collector boxes...
    Last edited by R Counts; 12-08-2009 at 05:17 AM.

  13. #13

    Default

    Yes, a picture is worth a thousand words. I do understand the dilemma you are facing with the space limitations. You are almost at the old log style design that was popular on some of the older engines. Surprisingly they can be quite suitable especially on a smaller cube engine that is not revving past 3500 RPM. This design was also well suited to casting so the manufacturing cost was kept low. Please post some pictures when you are making them.
    Wayne

  14. #14

    Default

    Quote Originally Posted by WAYNESWORLD View Post
    Yes, a picture is worth a thousand words...
    Agreed - and with a few well-chosen words (description) to suppliment the picture it all becomes clearer still

    Quote Originally Posted by WAYNESWORLD View Post
    You are almost at the old log style design that was popular on some of the older engines...
    That is exactly where I got my inspiration - I figured if that type of design was good enough for the factory...

    Quote Originally Posted by WAYNESWORLD View Post
    Surprisingly they can be quite suitable especially on a smaller cube engine that is not revving past 3500 RPM.
    I'd say that pretty well describes my application - 262 cubic inches displacement, a 3600 RPM redline/HP peak, and peak torque at 1600 RPMs...

    Quote Originally Posted by WAYNESWORLD View Post
    This design was also well suited to casting so the manufacturing cost was kept low.
    In my case it is well suited to being fabricated in sections that I can then piece together - allowing for easier (and more low-profile) attachment of the runners to both the mounting flange AND to the collector .

    Quote Originally Posted by WAYNESWORLD View Post
    Please post some pictures when you are making them.
    Wayne
    You got it. Now if the weather and the rest of my LIFE will just quit conspiring together to keep me from getting to work on it

  15. #15

    Default

    Well, everything FINALLY came together and I got to try out my new SuperCut50 today! It only took a me a month to get around to actually using it.

    All I can say is WAHOOOO! This thing is S-W-E-E-T!

    I made a few cuts in some 1/4" plate to try it out. I cut one of my header mounting flanges and one of the motor mount pieces. I have to say, I am seriously impressed. The only limitation to how smooth and straight the cut you get with it is how steady your hand is.

    As far as I can see, there is only one disadvantage to using this machine to cut steel. That is the fact that it cuts so darned easy and fast that you have to be really careful, and watch what you're doing really closely - or you'll end up cutting farther than you want to - or get off track and make more of a cut than you want!

    I can see where with just a little practice I am going to absolutely LOVE using this little tool...
    Last edited by R Counts; 12-27-2009 at 01:07 AM.

  16. #16

    Default

    IF you are cutting a lot of straight lines, I would suggest that you buy a piece of 1/4" x 1 aluminum flat bar. You can use this as a guide, by running the nozzle up against the side of the flat bar. This works well for drag cutting, under 3/8". Above 3/8, you can use the standoff and still make it work, but a lot of compensation must be done to cut on the line...The result will be a razor sharp edge, perfectly straight.
    Attached Thumbnails Attached Thumbnails Click image for larger version. 

Name:	loaderbucket2 005.jpg 
Views:	264 
Size:	96.4 KB 
ID:	212  
    Last edited by performance; 12-27-2009 at 02:12 AM.

  17. #17

    Default

    The straight bar works great but for other shapes you can also make patterns wit 3/8 plywood and a jig saw. Just measure your offset and cut your pattern to compensate.
    Wayne

  18. #18

    Default

    Yes, plywood wood works quite well for patterns.

    I like to mock up parts with cardboard, then trace them on the steel and cut as well.

    But Mark is right on with the straight cuts, and his is reusable.
    Mike R.
    Email: admineverlast@everlastwelders.com
    www.everlastgenerators.com
    www.everlastwelders.com
    877-755-9353 x203
    M-F 12 - 7PM PST
    FYI: PP50, PP80, IMIG-200, IMIG-250P, 210EXT and 255EXT.

  19. #19

    Default

    Quote Originally Posted by everlastsupport View Post
    Yes, plywood wood works quite well for patterns.

    I like to mock up parts with cardboard, then trace them on the steel and cut as well.

    But Mark is right on with the straight cuts, and his is reusable.
    The straight edge sounds like a great idea - I think I have a piece of 1/2" angle iron that will work well for that - if/when I have to make some long straight cuts.

    The plywood patterns also sound like a good idea - especially if you're making more than a couple of parts that are the same shape.

    Unfortunately, for the project at hand I'm making a lot of one-off or two of a kind parts, so the time investment to make patterns is a bit more than its worth.

    I just have to do some more practicing and develop a steadier hand to get the smoother cuts I'm looking for. God willing, the weather this 4-day weekend will stay dry enough to let me get some real practice...

  20. #20

    Default

    Just thought I'd post a minor update. So far I have cut both my motor mounting brackets, both exhaust flanges, and also made a few cuts on the square tubing for my exhaust manifolds. I'm getting steadier with my cuts as I get more practice.

    A couple of techniques I'd found that help are 1) use my free hand to help steady and guide the torch, and 2) when following a paint-pen line drawn on a piece of steel it helps to tilt the torch so that the plasma jet is pointed in the direction I want to cut. Kind of "push" cutting rather than actual "drag" cutting. This allows me to see both the line and exactly where the jet is cutting a lot better - helping me to stay more precisely on the line.

    Is there any disadvantage to this "push" cutting technique? It isn't going to cause me to wear out tips faster or anything like that, is it?

Posting Permissions

  • You may not post new threads
  • You may not post replies
  • You may not post attachments
  • You may not edit your posts
  •