 Aluminum Specialized Bicycle Seat Post Clamp Repair (TIG weld)
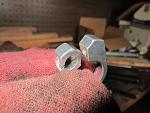
I TIG weld repaired a broken seat post clamp for a pretty high end Specialized Road bike.
It failed from overtightening. The owner's manual only calls for something like 4 foot-pounds.


I started by vicing it and hammering it a little closer to undo the stretching that had occurred. I also used vice grips to massage it back closer to its original shape.

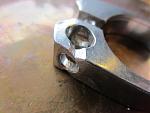
After getting it massaged into rough shape, I used carbide burr to vee out the bulk of the crack, to prep it for TIG welding with full penetration. I also dressed it with a file, and used some solvent as well to prep things clean and dry.
I had an .040" tungsten in there, so I went with it. A little helium mix. It was fun welding with that little tungsten and the helium! I used an arc down to 2 amps AC (indicated on my machine's display at least) Who knew helium could be sustained with stability at such low amperages. It was small enough current I had good control of the puddle despite this part being almost jewerly-sized. After fully penetrating the weld repair, I built the surface up for some additional strength that the part never originally had. I should have taken a picture before I did the build-up, but didn't get one; oh well.
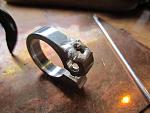

I never use a cup this small... but figured what the heck let's give it a try. It was a #4. (And in hindsight, shielding probably would have been noticeably better if I had a #5 on there.)
Then I took the welded surface down to the final desired dimensions using things like the 4.5" angle grinder with flap disc to get things "roughed" into shape, followed by some flat hand filing, drilling, and counter-sinking. Surfaced it on my granite surface plate with spray-mounted sandpaper. Finally, grained it evenly with a maroon scotch-brite hand pad. Didn't that that long since it was such a small part.
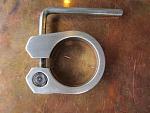


The part being build up higher than it was originally where it failed, means it is more rigid than it was new and likely stronger, too.
Machine used: Everlast Super200P. 1/16" 5356 filler rod.
Last edited by jakeru; 07-03-2012 at 06:47 AM.
'13 Everlast 255EXT
'07 Everlast Super200P


 Reply With Quote