Share
Page 1 of 2 12 LastLast
Results 1 to 20 of 21

Thread: Project 4 from Trip. Category: General Welding repair

  1. #1
    Join Date
    Sep 2011
    Location
    Middleburg Florida
    Posts
    556

    Default Project 4 from Trip. Category: General Welding repair

    I posted about this in another thread, inquiring about the alloys involved, gave it a test and it looks to weld just fine, so I figured I'd get started on a project thread.

    Imagine a beat to hell, 30 year old portaband. Greasy, grimy, chipped rattlecan, etc. I say imagine because in my haste to start, I didn't get a good pic of it as it arrived. Neighbor gave it to me thinking I could make some new parts to repair it, he was tired of messing with it.
    Here's a pic from disassembly, the rest of it was just as nasty as this area under the drive wheel:


    So the main problem was a loose screw on the idler wheel shaft. Once I saw I could easily fix that, I started tearing it down with the intention of fully rebuilding and refreshing it. BOTH ends turned out to need welding, three pieces total, three crack repairs and one rebuilding of a missing piece.

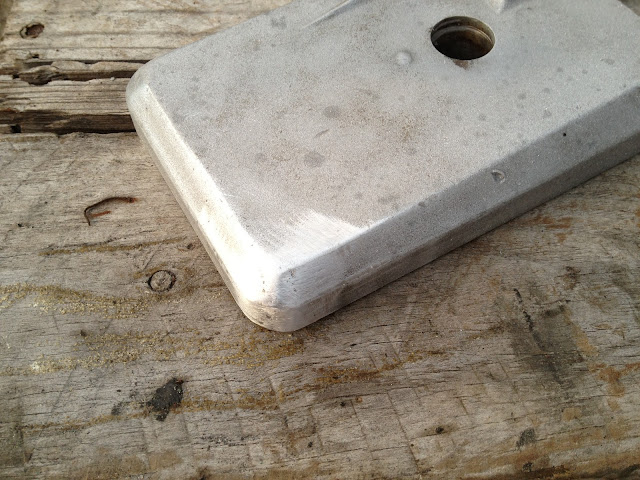
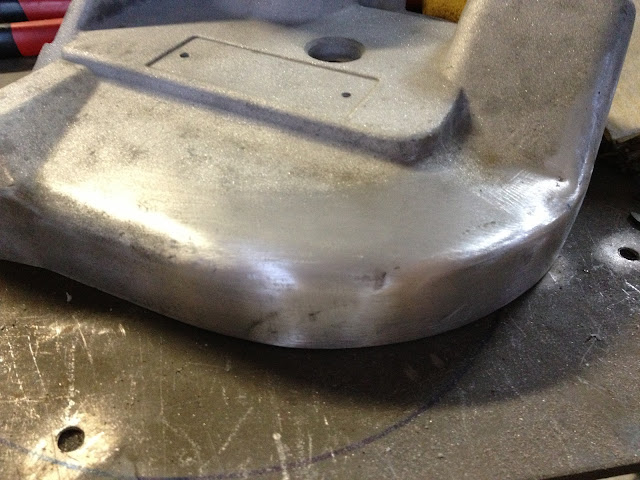
    Sandblasted cover on idler end, this is the part the tensioning lever goes through and the handle attaches to:


    Outer corner crack


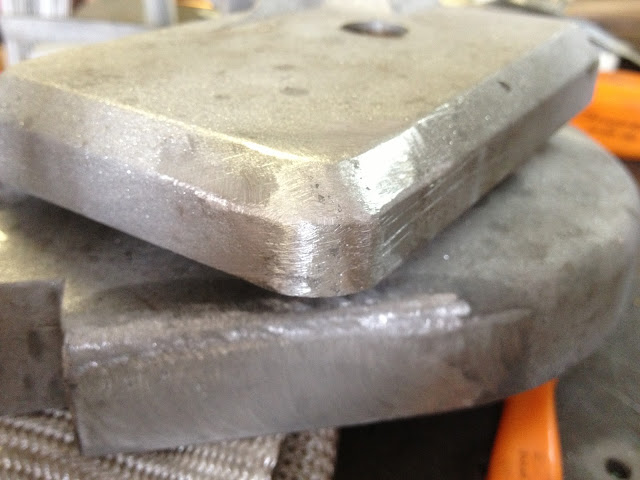
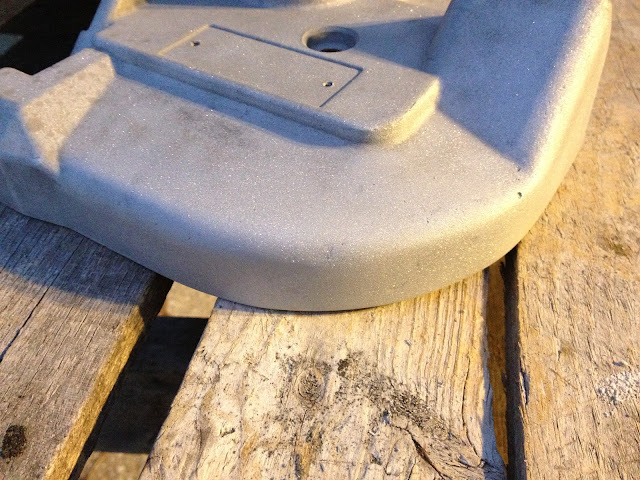
    Crack at the base of the bearing boss the tensioner goes through, it's about 3/4 the way around


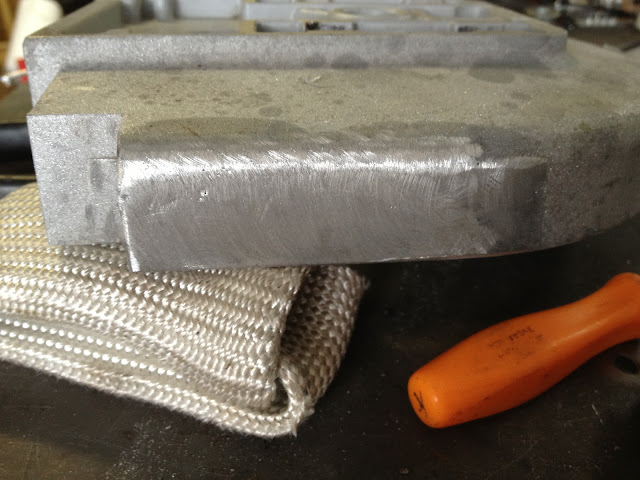
    Looks like it took a fall to the side, this is where the blade runs through on the idler end


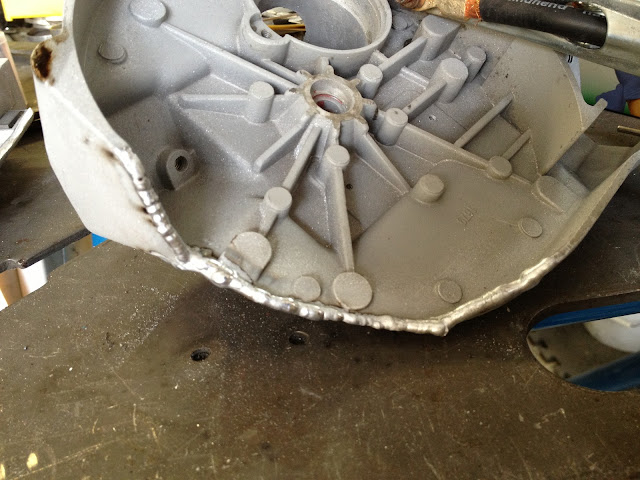
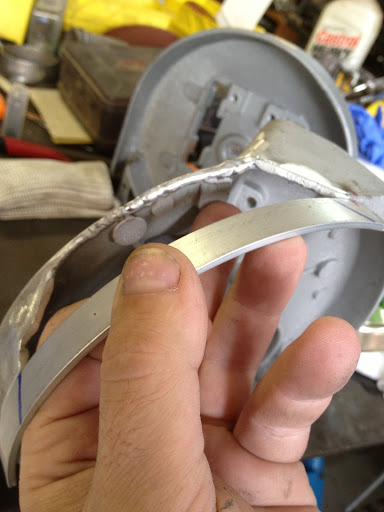
    And the BIG repair I tore it down for (might as well fix the rest and paint it while I'm at it, right?)

    I need a new cord and new tires, but short of that and a snap ring, it looks like everything else is salvageable. Should have the weld pics up in a day or two depending on how my Ar holds out, down to about 400psi on a 125cuft bottle with a slider in first. Oh, and just my luck, the slider is cast aluminum too...
    Trip Bauer
    Former USN HT
    Everlast 200DX New Model
    Hobart Handler 125 MIG
    Van Norman #12
    Atlas 12" engine lathe
    '98 RoadKing - 84 Ironhead - 59 Ironhead

  2. #2
    Join Date
    May 2012
    Location
    Disneyland
    Posts
    2,662

    Default

    Quote Originally Posted by Trip59 View Post
    ...Looks like it took a fall...
    ...Off the back of a truck going down the freeway at 100 mph.
    Long arc, short arc, heliarc and in-the-dark!

  3. #3
    Join Date
    Sep 2011
    Location
    Middleburg Florida
    Posts
    556

    Default

    Quote Originally Posted by Rambozo View Post
    ...Off the back of a truck going down the freeway at 100 mph.
    Maybe, but if you saw this guy work... sometimes I think his former career was as an underwriters laboratory master tester
    Trip Bauer
    Former USN HT
    Everlast 200DX New Model
    Hobart Handler 125 MIG
    Van Norman #12
    Atlas 12" engine lathe
    '98 RoadKing - 84 Ironhead - 59 Ironhead

  4. #4
    Join Date
    Sep 2011
    Location
    Middleburg Florida
    Posts
    556

    Default

    Ok, worked on it a bit today till I ran out of Ar (well, 100psi but I didn't want to push it, lol)

    Went to straighten the bent and cracked piece on the idler guard, sure enough, it broke...


    So I beveled, fitted, tacked, etc. You can see the autogenous tack at the upper left cracked right through, but it held long enough to get the rest of the tacks in. I saw it was raised a touch, but sure enough, it sucked back down level once the full bead was on. Stitch welded 1" at a time, 3 1/2 beads, wet the ends in nice. didn't remember to snap a pic post-weld/pre-grind, but here's the after


    One little void near the end, not worried about it.


    Dressed it down a touch more before painting, this corner was cracked all the way up onto the top flat, grooved it with a burr and went to town


    Laid a bead along the whole edge to get it ready to weld in replacement metal. Figured a bead or two would give me nice metal to weld to when I was trying to get the new parts in there. Ran out of gas, going to put another pass or two, then grind it relatively smooth so making the new pieces is nice and easy. I probably should have cut it back a bit to make nice straight lines, but this is also a bit of practice for odd cast repairs that I have to work with what's there without being able to remove anything (like my engine case repairs coming up) I may build out weld metal a bit more till I can get some straight-ish lines. I'm going to use metal a good bit thicker than it needs so I can round the corners and get the contours right... plus it's what I have on hand
    Trip Bauer
    Former USN HT
    Everlast 200DX New Model
    Hobart Handler 125 MIG
    Van Norman #12
    Atlas 12" engine lathe
    '98 RoadKing - 84 Ironhead - 59 Ironhead

  5. #5

    Default

    Nice job. I'm sure there will be quite a few us who appreciate you detailing your project. I can't wait to see the rest.

  6. #6
    Join Date
    Sep 2011
    Location
    Middleburg Florida
    Posts
    556

    Default

    Thanks! I'll be sure to snap more as I go through, the rest of the welding as well as reassembly. This may become a regular thing, I'm fed up with horrible freight tools, this project turned a light on in the attic; buy old broken, fix up and use. Neighbor wanted to start finding me tools to rebuild and sell, but unfortunately, I don't see the $$ in it to make it worthwhile... though I do have a recip saw to rebuild the blade lock for him

    Wouldn't you know it, sanded, degreased, rinsed, hit it with phosphoric acid, rinsed and did an alcohol wipe, all that prep and the FKN PAINT RAN and a damn bug got stuck in it. So one piece gets sanded and re-shot tomorrow.
    Trip Bauer
    Former USN HT
    Everlast 200DX New Model
    Hobart Handler 125 MIG
    Van Norman #12
    Atlas 12" engine lathe
    '98 RoadKing - 84 Ironhead - 59 Ironhead

  7. #7
    Join Date
    Sep 2011
    Location
    Middleburg Florida
    Posts
    556

    Default

    Ok, so after getting the bottle filled and bent over ($62 including tax and fees for a 125???) I got everything going today. Cut some pieces out of a bar I had, the thicker material would have been just too much, so I went with this stuff, though I had to use two pieces, the weld between them was a piece of cake. I used my 6" three jaw chuck as a mandrel and held one end, forcing the other down with my other hand, with springback it came to the exact curve I needed, just barely a nudge by hand to straighten it a touch.


    Rough fitup, I beveled all edges prior to welding


    And the final product after a grinding and media blasting. The pics in-process didn't come out, I need to start checking pics when I snap them, had grease on the lens...


    I had to blast the parts I painted last night, damn paint didn't cure properly and had run like mad, more than I thought.
    Trip Bauer
    Former USN HT
    Everlast 200DX New Model
    Hobart Handler 125 MIG
    Van Norman #12
    Atlas 12" engine lathe
    '98 RoadKing - 84 Ironhead - 59 Ironhead

  8. Default

    Can't even tell there was missing metal there. Looks really good.
    Poewr I-Mig 205P
    Powertig 185

  9. #9
    Join Date
    Sep 2011
    Location
    Middleburg Florida
    Posts
    556

    Default

    Thanks! Had to strip the first attempt of paint off, ran like mad. I shot all the parts last night and should be putting it back together tomorrow, will post pics when it's done. Next step is to make both a table and a pivoting base to make it work like a vertical AND a horizontal saw, save me some space over buying one and maintain the portability. I'm working on a quick connect for that, so many of them you have to unbolt the front handle to put it in the storebought horizontal. Might have to wait till my mill is done though.
    Trip Bauer
    Former USN HT
    Everlast 200DX New Model
    Hobart Handler 125 MIG
    Van Norman #12
    Atlas 12" engine lathe
    '98 RoadKing - 84 Ironhead - 59 Ironhead

  10. Default

    Last time I used my portable bandsaw the blade kept slipping and it barely cut through anything. I ordered new blades for it, got the Lennox 3-pack for like 40 bucks. It cut through the metal tubing like freaking butter. I would highly recommend getting yourself a decent blade if it doesn't already have one on it.
    Poewr I-Mig 205P
    Powertig 185

  11. #11
    Join Date
    Nov 2012
    Location
    Whine Country, California
    Posts
    442

    Default

    Your repaired areas turned out very nice, especially considering that you started with a piece of junk!

    Quote Originally Posted by Trip59 View Post
    I had to blast the parts I painted last night, damn paint didn't cure properly and had run like mad, more than I thought.
    You should really use a self etching primer on that bare metal (you can get it at your local auto parts store in spray cans for around $5 or $6). Probably not what you want to hear, but it does a nice job of getting the paint to adhere to bare metal, and can usually be scuffed off the next day as it is fast drying. Plus it hides the imperfections nicely and creates less transparency when applying the top coat of paint.

    Quote Originally Posted by Trip59 View Post
    Thanks! I'll be sure to snap more as I go through, the rest of the welding as well as reassembly. This may become a regular thing, I'm fed up with horrible freight tools, this project turned a light on in the attic; buy old broken, fix up and use.
    My feeling exactly! I rebuilt a 1950's Atlas lathe this year for the same reason, and I'm getting ready to repair/rebuild a few other vintage tools that are missing parts or are damaged! It's bad enough that tools are so expensive to begin with, but even the quality on tools today from high-end manufactures isn't what it was 30 or 40 years ago! I can hardly afford to buy stuff once, let alone 2 or 3 times over!

    Quote Originally Posted by agent4573 View Post
    Last time I used my portable bandsaw the blade kept slipping and it barely cut through anything. I ordered new blades for it, got the Lennox 3-pack for like 40 bucks. It cut through the metal tubing like freaking butter. I would highly recommend getting yourself a decent blade if it doesn't already have one on it.
    I use the Milwaukee brand blades for my Milwaukee portable bandsaw, but I might look for the Lennox ones next time. I always had good luck with them in my portable (read:HAND) hacksaw-LOL. The local hardware store only carries one brand of blades for portable (power) saws, so I'm limited on options locally.
    Andy
    New Everlast PowerTig 250EX that is begging for me to come up with a few welding projects so it can stretch it's legs. Did someone say aluminum???

    MISC. TOOLS:
    Atlas 618 lathe
    Milwaukee Porta Band with custom made stand
    Dewalt 4-1/2" angle grinder
    Dewalt 14" chop saw

    Strong Hand Nomad portable table
    Juki sewing machine I've had for years (yes I know sewing is for girls)

  12. #12
    Join Date
    Sep 2011
    Location
    Middleburg Florida
    Posts
    556

    Default

    Quote Originally Posted by youngnstudly View Post
    Your repaired areas turned out very nice, especially considering that you started with a piece of junk!

    You should really use a self etching primer on that bare metal (you can get it at your local auto parts store in spray cans for around $5 or $6). Probably not what you want to hear, but it does a nice job of getting the paint to adhere to bare metal, and can usually be scuffed off the next day as it is fast drying. Plus it hides the imperfections nicely and creates less transparency when applying the top coat of paint.

    My feeling exactly! I rebuilt a 1950's Atlas lathe this year for the same reason, and I'm getting ready to repair/rebuild a few other vintage tools that are missing parts or are damaged! It's bad enough that tools are so expensive to begin with, but even the quality on tools today from high-end manufactures isn't what it was 30 or 40 years ago! I can hardly afford to buy stuff once, let alone 2 or 3 times over!

    I use the Milwaukee brand blades for my Milwaukee portable bandsaw, but I might look for the Lennox ones next time. I always had good luck with them in my portable (read:HAND) hacksaw-LOL. The local hardware store only carries one brand of blades for portable (power) saws, so I'm limited on options locally.
    Don't remember what blades I bought, but that's what started this. I borrowed his other saw a year or so ago, bought a three pack of blades, gave him one as a thank you, left the one I used on the saw and hung one on my wall in case I needed to borrow it again (this guy is hell on tools, no counting on a usable blade). He knew I had one and borrowed it, then gave me that blade and the saw back, as well as a used other blade (will save for the metal, blade is shot). I picked them up at Lowes and they sure do cut nice, was about $20 for 3 if I recall.

    As far as the paint, I'm not sold on the cheapie self etching primers, if I went PPG or something, yeah, but I'd rather follow my process. Degrease, rinse, etch, rinse, paint. The can must have been a bad can, or wouldn't mix right, but it ran on wood, I chucked it. The other paint I used turned out fine. The goal of this is to not spend anything, thus the two pieces of filler instead of just buying a 1"x1/8"...

    Rebuilding the banjo on my Atlas/Craftsman (though it's being replaced with hopefully a Monarch this summer) rebuilding a 40's Van Norman mill, etc. Those are easy to see the value. I hadn't really thought about refurbing smaller tools, but this one really turned my thoughts around. I am pretty happy with the new Milwaukee 14" abrasive saw I bought last year, even though it's Taiwanese.
    Trip Bauer
    Former USN HT
    Everlast 200DX New Model
    Hobart Handler 125 MIG
    Van Norman #12
    Atlas 12" engine lathe
    '98 RoadKing - 84 Ironhead - 59 Ironhead

  13. #13

    Default

    Your doing a great job and I appreciate all the detail pics!! Nice work!
    PowerTig 250EX
    Power I-MIG 200
    Power Plasma 50
    It's what you learn, After you know it all, that counts!

  14. #14
    Join Date
    Sep 2011
    Location
    Middleburg Florida
    Posts
    556

    Default

    Reassembly was, well... reassembly. I have one more piece to weld up (the guard) and several parts to order (tires, one washer, two snap rings) and then I'll start on the table and pivoting mount.


    The gray stripe was the bearing support for the armature, didn't want to tap out and I didn't want to break anything trying to press it, if I replace the bearings later I'll do it and paint it. I shortened the cord, started at the plug and looked along till the first tape ball, cut it there and still had around 6' of cord left. Doesn't really need to be much longer, it'll almost always be on an extension cord anyhow.
    Trip Bauer
    Former USN HT
    Everlast 200DX New Model
    Hobart Handler 125 MIG
    Van Norman #12
    Atlas 12" engine lathe
    '98 RoadKing - 84 Ironhead - 59 Ironhead

  15. #15
    Join Date
    Dec 2009
    Location
    Greater Seattle, WA
    Posts
    813

    Default

    Nice work, Trip!
    '13 Everlast 255EXT
    '07 Everlast Super200P

  16. #16

    Default

    That looks extremely nice. I wish someone would give me something like that even if it needed repairs. I have been thinking about getting a bandsaw.
    Jason
    Everlast 255EXT - Perfection
    Everlast PowerPro 256 - UPS Demolished
    Everlast MTS200s
    12 Ton Shop Press
    DeWalt Hand Tools/ChopSaw

  17. #17
    Join Date
    Nov 2012
    Location
    Whine Country, California
    Posts
    442

    Default

    Quote Originally Posted by Trip59 View Post
    As far as the paint, I'm not sold on the cheapie self etching primers, if I went PPG or something, yeah, but I'd rather follow my process. Degrease, rinse, etch, rinse, paint. The can must have been a bad can, or wouldn't mix right, but it ran on wood, I chucked it. The other paint I used turned out fine. The goal of this is to not spend anything, thus the two pieces of filler instead of just buying a 1"x1/8"...

    Rebuilding the banjo on my Atlas/Craftsman (though it's being replaced with hopefully a Monarch this summer) rebuilding a 40's Van Norman mill, etc. Those are easy to see the value. I hadn't really thought about refurbing smaller tools, but this one really turned my thoughts around. I am pretty happy with the new Milwaukee 14" abrasive saw I bought last year, even though it's Taiwanese.
    I agree with you on the self etching primers in spray can form, but I don't have the ability to professionally spray parts...you'd think I would be good with a spray gun since my father has been building hot rods and restoring cars for 40 years, but around 15 years ago he started seeing that his trade was going down the tubes, so he never began teaching me auto body and paint. He knew it wouldn't be a lasting career for me. I learned some forming and shaping, hammer and dolly work, and more specialized welding techniques for sheet metal through my Union trade school, but the only spray gun I've ever "fiddled" with was the glue gun setup at work-LOL. I can't stand the smell of those chemicals anyways (especially primers!), so it worked out for the best.

    My goal lately has been to spend as little as possible on stuff (No income since August!), so I totally understand not wanting to spend money to piece together "freebie" tools. I bought a few Milwaukee brand drill (right angle) adapters, a chuck for my impact gun, and mandrels for Milwaukee hole saws, and most of those parts are made in Taiwan too.

    The saw looks like new! I enjoyed seeing the progress you made on it!
    Andy
    New Everlast PowerTig 250EX that is begging for me to come up with a few welding projects so it can stretch it's legs. Did someone say aluminum???

    MISC. TOOLS:
    Atlas 618 lathe
    Milwaukee Porta Band with custom made stand
    Dewalt 4-1/2" angle grinder
    Dewalt 14" chop saw

    Strong Hand Nomad portable table
    Juki sewing machine I've had for years (yes I know sewing is for girls)

  18. #18
    Join Date
    Oct 2010
    Location
    Northern Virginia
    Posts
    1,323

    Default

    When you first posted I remember thinking "How's he gonna do that without the broken off pieces", and then saw your post #7. Nicely done.

    I like the "buy old and rebuild" idea, which works because you already have the trade-off in mind (effort vs. return).
    DaveO
    Oxweld oxy acet gear
    IMIG 200
    PowerTIG 210 EXT... Amazing!

  19. Default

    That came out very very nice. Good job.
    Poewr I-Mig 205P
    Powertig 185

  20. #20

    Default

    A little off topic but doing collision is not on the verge of death is it.. I know the work sucks but if someone really wanted that career, wouldn't that be a place to suffice.
    Jason
    Everlast 255EXT - Perfection
    Everlast PowerPro 256 - UPS Demolished
    Everlast MTS200s
    12 Ton Shop Press
    DeWalt Hand Tools/ChopSaw

Similar Threads

  1. Project 2 from Youngnstudly. Category: General Welding Repair
    By youngnstudly in forum Welding Repairs
    Replies: 7
    Last Post: 02-01-2013, 06:34 AM
  2. Project 2 from Rambozo. Category: General Welding Repair
    By Rambozo in forum Welding Repairs
    Replies: 5
    Last Post: 11-21-2012, 08:48 PM
  3. Project 1 from Rambozo. Category: General Welding repair
    By Rambozo in forum Heavy Equipment and Commercial Projects
    Replies: 14
    Last Post: 08-01-2012, 01:45 AM
  4. Project 1 from CGCINC: Category: General welding repair
    By CGCINC in forum Welding Repairs
    Replies: 15
    Last Post: 07-17-2012, 03:24 AM
  5. Project 1 from undercut. Category: General Welding repair
    By undercut in forum Welding Repairs
    Replies: 4
    Last Post: 07-15-2012, 02:01 AM

Posting Permissions

  • You may not post new threads
  • You may not post replies
  • You may not post attachments
  • You may not edit your posts
  •