Share
Results 1 to 13 of 13

Thread: Harbor Freight English Wheel Upgrade - Project2 by Spike Category: welded Shop tools

  1. #1

    Default Harbor Freight English Wheel Upgrade - Project2 by Spike Category: welded Shop tools

    Hey folks,
    I've been using a Harbor Freight english wheel many years ago. It's served me quite well, one of the best performing things i've gotten from HF to date.
    Now that i've finished building my custom power hammer, though, i find i need my english wheel to have a little more "OOMPH" to keep up with the power hammer's shaping speed.

    I've heard some stories from people about needed to 'true' the wheels or surface problems on the anvils or bearings, but i lucked out and my wheel has always tracked true and never given me any problems that way.

    So, since my wheel works great, i just want to improve it... namely i'm going to stiffen the frame up to add the needed rigidity to shape panels more evenly, accurately, and speedily.

    Starting with this:


    I plan to triangulate the frame above the upper arm and back to reinforce and stiffen the chassis.

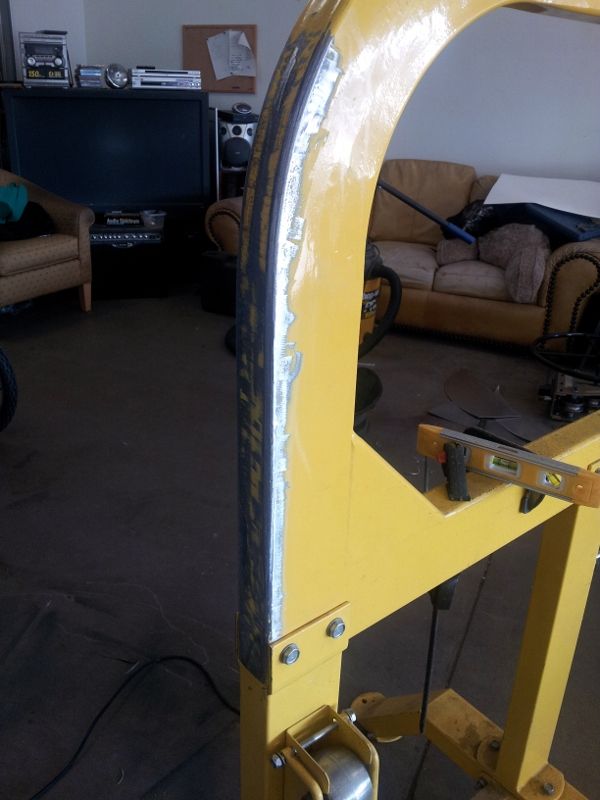
    Grinding off all the thick powder coat can be a pain, but i use a trick: i use a cut-off wheel turned sideways like a grinder. The extremely aggressive grit cuts through the coating in one pass, and since the wheel gets worn away, it doesn't get hot and load up with melted powder coat like a sanding disc or flap wheel.


    Mocking up the vertical and horizontal beams on the frame:


    Now, over the years my frame has "stretched" up a little bit, from the constant upward pressure of wheel work. I don't want to reinforce the frame like this, and i want to keep the heat from stretching the arm even further upward while welding. So i used a few tie straps through the top wheel and around the lower arm to pull the upper arm back down into position.


    Some welds on the Arms to get them in place


    When welding tubes like this with rounded corners together, make sure you get a good solid root weld into the valley.


    And while you are welding, don't weld in one spot on one side too much, otherwise you will warp your frame. Stagger your welds from one side to the other in different areas to keep heat-warp to a minimum.


    First round of welds all done


    And i was mocking up the upper bar for the triangle when i ran out of work-time for the day.


    I'll post up some more pictures when it's done.
    -------------------------------------------
    Spike Customs, Inc.
    Fresno, CA 93727
    ph- 559-549-RIDE(7433)
    -------------------------------------------
    -Follow me on twitter!-

  2. #2

    Default

    Very nice! I appreciate how you've annotated all of your thought processes and steps. Looks pretty beefy.

  3. #3
    Join Date
    Mar 2011
    Location
    Eastern Oregon
    Posts
    681

    Default

    Agreed, nice presentation. Now if I ever do get one, I'll know to beef it up right out of the chute.
    Penncrest Buzzbox - Infinite amp control! Man the 70's were good.
    Everlast Powerplasma 60 - Reliable unit, cuts well.
    Everlast i-MIG 250P w/spoolgun - Really smooth, plenty of cajones.
    Everlast 250EXT - Sometimes it just takes a kick in the balls...
    Everlast 255EXT - Just started playing

  4. #4

    Default

    Got the to bar cut and welded in today. The wheel works a lot better now. I think i'm going to have to triangulate the bar on the back to get all the rigidity that i'm looking for... But its a great improvement over the original design. I'm very happy with it.
    In the picture I've sprayed some paint on the edges just to keep them from rusting before I can figure out what color to paint it.
    Attached Thumbnails Attached Thumbnails Click image for larger version. 

Name:	uploadfromtaptalk1360045743527.jpg 
Views:	2447 
Size:	67.8 KB 
ID:	9336  
    -------------------------------------------
    Spike Customs, Inc.
    Fresno, CA 93727
    ph- 559-549-RIDE(7433)
    -------------------------------------------
    -Follow me on twitter!-

  5. #5

    Default

    Do yourself a favor and get one of these for the top roller and you will be please with what you can do with it.
    http://www.castercity.com/eshop/10Ex...To=../pwic.htm

    here is a video of my wheel with one on it
    http://www.youtube.com/watch?v=kkRIf7k402c

    have fun

    Tom

    Everlast PM256
    Millermatic 180
    Hypertherm PowerMax 65 with machine torch
    Longevity Force Cut 80I
    DIY CNC table for plasma/routing
    13" metal lathe
    Small Mill
    ect, ect.

  6. #6

    Default

    Yep yep. Mine is green.
    -------------------------------------------
    Spike Customs, Inc.
    Fresno, CA 93727
    ph- 559-549-RIDE(7433)
    -------------------------------------------
    -Follow me on twitter!-

  7. #7

    Default

    Put the back triangles on the wheel this morning.
    Click image for larger version. 

Name:	uploadfromtaptalk1360104091025.jpg 
Views:	2879 
Size:	67.6 KB 
ID:	9340
    -------------------------------------------
    Spike Customs, Inc.
    Fresno, CA 93727
    ph- 559-549-RIDE(7433)
    -------------------------------------------
    -Follow me on twitter!-

  8. #8

    Default

    This tempts me to go get one of these.
    Jason
    Everlast 255EXT - Perfection
    Everlast PowerPro 256 - UPS Demolished
    Everlast MTS200s
    12 Ton Shop Press
    DeWalt Hand Tools/ChopSaw

  9. #9

    Default

    YOu may want to look over this guy's site for the modifying he did to the HF E wheel.

    http://www.jamesriser.com/Machinery/...l/Finally.html

    have fun
    Tom

    Everlast PM256
    Millermatic 180
    Hypertherm PowerMax 65 with machine torch
    Longevity Force Cut 80I
    DIY CNC table for plasma/routing
    13" metal lathe
    Small Mill
    ect, ect.

  10. #10
    Join Date
    May 2012
    Location
    Disneyland
    Posts
    2,662

    Default

    Another option for a soft wheel face is a band cut from an inner tube. Easy on and off as needed, since you can leave it on the machine.

    Long arc, short arc, heliarc and in-the-dark!

  11. #11
    Join Date
    Nov 2012
    Location
    Whine Country, California
    Posts
    442

    Default

    There's some great stuff posted here on E wheels! I wish I had the space for one of the HF E wheels. I might make a smaller vise mounted version in the future, after seeing a lot of good ideas posted on the machine tooling and metal working forums. It's too bad your frame from HF is powder coated, as it seems like everyone modifies the HF frames for more rigidity anyways. Paint would be a lot easier to remove!

    BTW, I love your shop setup. Well equipped and a lot of space for projects. Good thinking on bringing in that monster TV and the couch to go with it!
    Andy
    New Everlast PowerTig 250EX that is begging for me to come up with a few welding projects so it can stretch it's legs. Did someone say aluminum???

    MISC. TOOLS:
    Atlas 618 lathe
    Milwaukee Porta Band with custom made stand
    Dewalt 4-1/2" angle grinder
    Dewalt 14" chop saw

    Strong Hand Nomad portable table
    Juki sewing machine I've had for years (yes I know sewing is for girls)

  12. Default

    Careful on grinding with those cutoff wheels, I've seen a few fly apart when they get side loaded like that.
    Poewr I-Mig 205P
    Powertig 185

  13. #13

    Default

    Quote Originally Posted by agent4573 View Post
    Careful on grinding with those cutoff wheels, I've seen a few fly apart when they get side loaded like that.
    Its not so much "grinding" down to the metal as "cutting sideways" along its surface. I'm not interested in digging resin wheel pieces out of my arm... I should have been clearer in my post. If using a cut off wheel sideways *DO NOT PUSH DOWN.* if you apply pressure like you would a flap disc it will explode.
    -------------------------------------------
    Spike Customs, Inc.
    Fresno, CA 93727
    ph- 559-549-RIDE(7433)
    -------------------------------------------
    -Follow me on twitter!-

Similar Threads

  1. Replies: 59
    Last Post: 02-19-2013, 11:16 AM
  2. Replies: 12
    Last Post: 12-30-2012, 06:05 PM
  3. Replies: 28
    Last Post: 12-26-2012, 03:01 AM
  4. Replies: 18
    Last Post: 09-07-2012, 07:46 PM
  5. Replies: 12
    Last Post: 07-19-2012, 09:03 PM

Tags for this Thread

Posting Permissions

  • You may not post new threads
  • You may not post replies
  • You may not post attachments
  • You may not edit your posts
  •