Share
Results 1 to 11 of 11

Thread: DIY : How to make a filler rod storage container\tubes on a $20 budget.

Hybrid View

Previous Post Previous Post   Next Post Next Post
  1. Default DIY : How to make a filler rod storage container\tubes on a $20 budget.

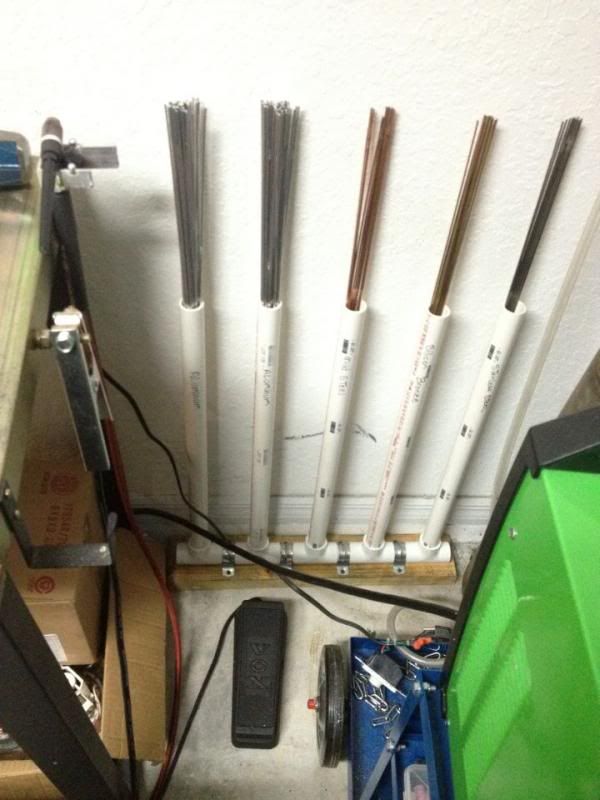
    Ok I wanted to do this the first time I bought my welder but I just didn't have the time.So this weekend I got fed up of leaving my welding table just to grab some more filler rod that I went to home depot and bought all the parts and build my own container.It is very easy and you can add your own twist too it when doing your own,I will just give you the easy basic way of doing it on a $20 budget.

    I made 5 individual containers but you can add as much as you want.Parts are:
    Qty (6) PVC Pipe 1 in. x 2 ft.
    Qty (5) PVC Tee Fitting 1 in.
    Qty (4) PVC pipe clamps for 1 in. pipes
    Qty (8) Dry wall screws 1 5/8 in.
    Qty (1) 2 x 4 in. ply wood 2 ft. long

    Cut (1) of the PVC Pipe 1 in. x 2 ft. into 3" in length to get a quantity of 4 pieces then insert them into the Tee fitting.Use a hammer and give them some light taps for the pipes to go all the way inside the Tee fittings.After you joined all the Tee fittings together,now place it on the 2x4 ply wood and put the clamps between each Tee fitting and screw them down securely in place using the dry wall screws.Insert the (5) PVC Pipe 1 in. x 2 ft into the Tee fitting and gently tap them in,you are now done and here is the final product.
  2. #2

    Default

    For best storage, you should extend the tubing and put screw on caps on them. This will stop some of the oxidation, and keep them more fresh.

  3. Default

    Thanks Mark I will grab some joiner and pipes the next time I am at the store.

  4. #4
    Join Date
    Nov 2012
    Location
    Whine Country, California
    Posts
    442

    Default

    I used the grey 1-1/4" PVC on my welding cart with slip on end caps, and glued the caps on one end while simply notching the other end's end cap. Once I figured out that the un-notched cap wouldn't remove without pliers and swear words, I notched them. They come off easy now. I keep the tubes that the filler rod comes in though and I simply slip those tubes into the PVC. The cool thing is the factory filler rod tubes will hold around 3 pounds of rod, so you can pile all of the different diameter rod of the same kind (say 309L or ER70S2) into one tube. Same basic idea though. I think I have 5 or 6 tubes on my cart at this point, so there is plenty of rod storage!
    Attached Thumbnails Attached Thumbnails Click image for larger version. 

Name:	IMG_1692.jpg 
Views:	1296 
Size:	126.7 KB 
ID:	10306  
    Andy
    New Everlast PowerTig 250EX that is begging for me to come up with a few welding projects so it can stretch it's legs. Did someone say aluminum???

    MISC. TOOLS:
    Atlas 618 lathe
    Milwaukee Porta Band with custom made stand
    Dewalt 4-1/2" angle grinder
    Dewalt 14" chop saw

    Strong Hand Nomad portable table
    Juki sewing machine I've had for years (yes I know sewing is for girls)

  5. Default

    That makes perfect sense with the notching of the caps Andy,thanks for the insight I shall do the same .

  6. #6
    Join Date
    Nov 2012
    Location
    Whine Country, California
    Posts
    442

    Default

    You're very welcome! I originally sanded them so they "popped" on and off easier but after I left them overnight, I still had trouble removing them the next day. Live and learn, I guess!
    Andy
    New Everlast PowerTig 250EX that is begging for me to come up with a few welding projects so it can stretch it's legs. Did someone say aluminum???

    MISC. TOOLS:
    Atlas 618 lathe
    Milwaukee Porta Band with custom made stand
    Dewalt 4-1/2" angle grinder
    Dewalt 14" chop saw

    Strong Hand Nomad portable table
    Juki sewing machine I've had for years (yes I know sewing is for girls)

  7. #7

    Default

    Quote Originally Posted by youngnstudly View Post
    You're very welcome! I originally sanded them so they "popped" on and off easier but after I left them overnight, I still had trouble removing them the next day. Live and learn, I guess!
    Interesting. I'm glad I saw this post as I'm sure I would have just tried sanding them as well. Thanks!

Similar Threads

  1. First container came in... just now
    By Oleg in forum Pre-sales, Sales and Shipping questions
    Replies: 17
    Last Post: 09-11-2013, 07:56 PM
  2. Need to make a Steel storage rack... any suggestions?
    By CGCINC in forum General Welding Questions
    Replies: 13
    Last Post: 08-11-2013, 08:29 PM
  3. Budget CNC table....anyone use this one?
    By CGCINC in forum Everlast Plasma Cutters (PAC)
    Replies: 25
    Last Post: 02-12-2013, 03:41 AM
  4. Project #5 from Spike : Very low-budget radius brake
    By Spike in forum Other Custom Fabrications
    Replies: 5
    Last Post: 02-17-2012, 08:10 AM
  5. Aluminum storage container
    By jakeru in forum Other Custom Fabrications
    Replies: 9
    Last Post: 04-05-2011, 06:04 AM

Posting Permissions

  • You may not post new threads
  • You may not post replies
  • You may not post attachments
  • You may not edit your posts
  •