Share
Results 1 to 7 of 7

Thread: Hitch Sprayer

  1. #1
    Join Date
    May 2012
    Location
    Disneyland
    Posts
    2,662

    Lightbulb Hitch Sprayer

    Here is the second of two hitch mounted boomless sprayers. First a model was made.

    Click image for larger version. 

Name:	HitchBoom 01.jpg 
Views:	287 
Size:	23.0 KB 
ID:	12160

    Then cut up all the pieces, and prep for welds. Still happy with the Northern corner clamps. Someday I have a few changes I want to make, though. I few gratuitous weld shots. All TIG and all with the 140ST

    Click image for larger version. 

Name:	HitchBoom 02.JPG 
Views:	256 
Size:	134.2 KB 
ID:	12161 Click image for larger version. 

Name:	HitchBoom 03.JPG 
Views:	272 
Size:	129.7 KB 
ID:	12162 Click image for larger version. 

Name:	HitchBoom 04.JPG 
Views:	259 
Size:	106.1 KB 
ID:	12163 Click image for larger version. 

Name:	HitchBoom 05.JPG 
Views:	276 
Size:	113.6 KB 
ID:	12164 Click image for larger version. 

Name:	HitchBoom 06.JPG 
Views:	277 
Size:	112.4 KB 
ID:	12165 Click image for larger version. 

Name:	HitchBoom 08.JPG 
Views:	278 
Size:	114.6 KB 
ID:	12166

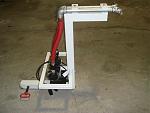
    I made a wedge that can be snugged up, so it removes all the slack in the hitch. I've done the same for a number of hitch mounted racks and devices, that I don't want bouncing around. It's much like the system to tighten the gooseneck on an old bicycle. A small cage to protect the valves and an adjustable place to mount the nozzles.

    Click image for larger version. 

Name:	HitchBoom 09.JPG 
Views:	270 
Size:	83.2 KB 
ID:	12167 Click image for larger version. 

Name:	HitchBoom 10.JPG 
Views:	285 
Size:	99.6 KB 
ID:	12168 Click image for larger version. 

Name:	HitchBoom 11.JPG 
Views:	272 
Size:	107.9 KB 
ID:	12169 Click image for larger version. 

Name:	HitchBoom 12.JPG 
Views:	284 
Size:	106.5 KB 
ID:	12170

    The finished product, and of course final inspection.

    Click image for larger version. 

Name:	HitchBoom 13.JPG 
Views:	286 
Size:	95.9 KB 
ID:	12171
    Long arc, short arc, heliarc and in-the-dark!

  2. #2
    Join Date
    Oct 2012
    Location
    Canada, Suttonwest, Ontario
    Posts
    676

    Default

    Nice job and I got to get one of those corner clamps.
    Everlast PowerTig 325EXT (Canada)
    Everlast Power I Mig 250 (Canada)
    Everlast PowerPlasma 80S (Canada)
    Everlast PowerCool W300 (Canada)
    Everlast PowerMTS 250S Fitted with a 30A Spoolgun(Canada)
    Miller Dynasty 400 wireless(Canada)
    Millermatic 252 plus 30A Spoolgun(Canada)

  3. #3

    Default

    I've got a bessey. Made things easier, quicker, and has paid for itself many times over since I bought it 8-9 years ago or so. I need the one now with the vertical axis as well. Have another one too, but not as heavy as the bessey.

  4. #4
    Join Date
    Oct 2010
    Location
    Northern Virginia
    Posts
    1,323

    Default

    I like the wedge idea to prevent the bounce around. Looks like it tightens via the hex nut at the outside end of the receiver tube, smart idea.

    BTW What is being sprayed?
    DaveO
    Oxweld oxy acet gear
    IMIG 200
    PowerTIG 210 EXT... Amazing!

  5. #5
    Join Date
    May 2012
    Location
    Disneyland
    Posts
    2,662

    Default

    Quote Originally Posted by DaveO View Post
    I like the wedge idea to prevent the bounce around. Looks like it tightens via the hex nut at the outside end of the receiver tube, smart idea.

    BTW What is being sprayed?
    Yes, that is just a long 1/2" bolt. The wedge part can be made from the piece you cut off with a nut welded on, or in this case I made it from a piece of 1" solid square, so that I could have a portion that fits inside the tubing and it keeps it from flopping around, when removed.

    Typically this is used for various kinds of weed control. One is going on the back of a Kubota RTV900 and the other will be used on various trucks.
    Long arc, short arc, heliarc and in-the-dark!

  6. #6
    Join Date
    Dec 2009
    Location
    Greater Seattle, WA
    Posts
    813

    Default

    Very nice, Rambozo! I recently bought a Yakima hitch-mounted bicycle rack for my family that has a somewhat similar "wedge" expansion feature to lock the piece inserted into the receiver firmly. It works very well and takes all the play there. The yakima expander design is very similar to yours, except the wedge is on the corner of the square receiver profile, rather than on the side/edge as yours is (but basically accomplishes the same thing - screw it together and it expands to take up any play). Always nice to see your projects, and first time I've seen a custom made version of an expanding receiver insert like this, so neat to see how it can be feasibly custom made.
    Last edited by jakeru; 06-19-2014 at 04:13 AM.
    '13 Everlast 255EXT
    '07 Everlast Super200P

  7. #7
    Join Date
    May 2012
    Location
    Disneyland
    Posts
    2,662

    Default

    Thanks, a corner would be better to remove both up and down as well as side to side play. I thought about it, but I was mainly concerned with the vertical bouncing, and wanted something easy to fabricate. With it snugged down you can get a little side motion, if you apply a lot of force.
    Long arc, short arc, heliarc and in-the-dark!

Similar Threads

  1. Hitch Em Up
    By Rambozo in forum Other Custom Fabrications
    Replies: 7
    Last Post: 12-03-2014, 02:59 PM
  2. Replies: 15
    Last Post: 06-06-2012, 03:27 AM
  3. Stiffen up a 24' trailer hitch
    By chadford in forum Welding Repairs
    Replies: 4
    Last Post: 07-27-2011, 01:29 AM

Posting Permissions

  • You may not post new threads
  • You may not post replies
  • You may not post attachments
  • You may not edit your posts
  •